Protect your phone with these iPhone security tips
Apple’s iOS is a relatively safe and secure operating system that has few vulnerabilities or significant bugs. But that doesn’t mean that its users can ignore their security. iPhones are not immune to phishing attacks, malware, and hackers. You need to know how to protect your phone and yourself. Let’s dive in.

Table of Contents
Table of Contents
Keep everything updated
Updates are a crucial part of your security. Software updates introduce new functionalities and patch vulnerabilities to prevent cyberattacks. Keeping your iPhone’s OS and apps updated will protect you from cybercriminals who use security loopholes to access your personal data.
To check if your iPhone is running the latest version of iOS:
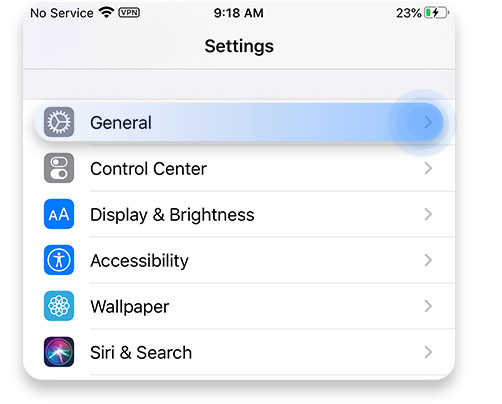
1. Go to Settings;
2. Scroll down and tap on General;

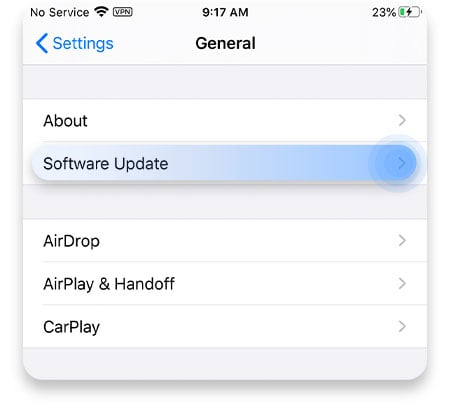
3. Tap on Software Update.

You will see which version of iOS you’re running and whether there’s an update available. Make sure you download and install the latest version to keep your device as safe as possible.
You should also go over your apps and see if there are newer versions available. It would also be a good idea to enable automatic updates both for iOS and your apps. This way, you won’t have to check if there are any available to keep your device up to date.
Change your passcode
The best way to secure an iPhone is with strong passwords. Use a long and completely random passcode for your iPhone and change it regularly. It should be next to impossible to instantly memorize if someone saw you enter it. So both “123456” and “666666” are out of the question. You can try using a random passcode generator for the best results.
Here’s how to set up a new passcode for iOS:
1. Go to Settings;
2. Scroll down and tap on Touch ID & Passcode (or Face ID & Passcode);

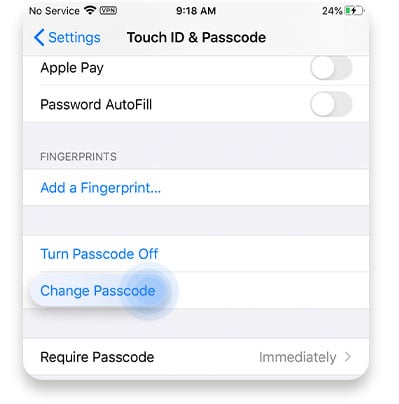
3. Enter your passcode, tap on Change passcode, and enter your passcode again;

4. Enter a new passcode and verify it.
You should also make sure that your phone locks after 15 or 30 seconds – you don’t want to risk leaving it unlocked for a minute or even more. That’s more than enough time for someone to access your confidential information, so don’t give them the chance.
Turn on Find My iPhone
You will be grateful you had this feature activated the next time you misplace your iPhone, especially if someone steals it. You will be able to locate it by using any other Apple device or a web browser. It will also give you the option to completely wipe your iPhone; this way, the person who stole or found it won’t be able to use your data.
Here’s how to turn on the Find My iPhone feature:
1. Go to Settings;
2. Tap on your name;

3. Select Find My;

4. Tap Find My iPhone;

5. Toggle all buttons to On.

You should also make sure that your phone locks after 15 or 30 seconds – you don’t want to risk leaving it unlocked for a minute or even more. That’s more than enough time for someone to access your confidential information, so don’t give them the chance.
Turn the Erase Data feature on
This tip might sound drastic, but it’s better to lose your information than lose it and know it ended up in a stranger’s hands. If you turn this feature on, your phone will automatically delete everything after the passcode is entered incorrectly ten times in a row.
There’s always the risk that you might accidentally do it yourself, so it’s understandable if you’re hesitant to use it. But that’s one more reason why you should have automatic backup enabled. If you safely store all your information in iCloud, you can easily set up a new iPhone without losing a single byte of data.
Here’s how to set up auto-wipe:
1. Go to Settings;
2. Scroll down and tap on Touch ID & Passcode (or Face ID & Passcode);

3. Enter your passcode and scroll down to Erase Data. Turn the toggle to On.

Read our blog post on blurring your sensitive data on screenshots or videos. It may help you enhance your iPhone security.
Go over your apps
Go to the Privacy settings on your iPhone and check every app’s permissions. You can set which ones are allowed to access your location, track you through Wi-Fi hotspots and Bluetooth connections, access your contacts, etc. Check which apps are allowed to access your camera as well, especially if your iPhone camera turns on by itself.
And while you’re at it – delete or hide apps on your iPhone you no longer use. If you recently moved, you should also consider changing your App store country. Each location has an App store with a different app selection. It means some apps on your iPhone may no longer be accessible.
Fewer apps mean there’s less chance of someone targeting you through one of them. Apps might have vulnerabilities (unknown even to their developers) that allow cybercriminals to infiltrate users’ devices, install malware, or steal their data. Also, if you share your device with children, consider learning how to lock iPhone screen for kids. It will help you make sure the little ones accidentally don’t change settings or expose your data.
Protect your accounts
If you use the same password for your every account, it means that all of them are always at risk. If one of the social networks you use is breached and your login details end up for sale online, it means that all your other credentials have been leaked too. Someone could use them to log in to all your social and work accounts, email, Apple ID, etc.
Therefore, get yourself a NordPass password manager, use a generator to come up with new, complicated passwords for every account, and set up two-factor authentication wherever you can.
Turn on USB Restricted mode
Turning on the USB Restricted mode will prevent USB cables from making data connections. It will protect you from becoming a victim of juice jacking. This is a cyberattack where hackers use USB cords to steal information from a device or install malware on it. You might be charging your phone while having lunch and someone will be logging your keystrokes in the background. This way, a hacker can get your passwords, home address, and credit card information.
While the best way to go about it is to avoid public charging ports, there’s one more thing you can do. Here’s how you turn on USB Restricted mode on your iPhone:
1. Go to Settings;
2. Scroll down and tap on Touch ID & Passcode (or Face ID & Passcode);

3. Enter your passcode and scroll down to USB Accessories. Turn the toggle to Off position.

Turn Siri off
For all it’s convenience, Siri is also a security hazard. With its default settings, Siri will still have access to your phone when it is locked. It means that anyone who wants to find out information about you can just ask your iPhone. Siri stores a lot of your personal information that you wouldn’t want to end up in a stranger’s hands, so it’s best to limit its access:
1. Go to Settings;
2. Scroll down and tap on Siri & Search;

3. Toggle Press Home for Siri and Allow Siri When Locked to the off position

In case you discover that your iPhone is infected with malicious software, check out our blog post to find out how to remove malware from your iPhone.
Use a VPN
What is a VPN and how can it help? A virtual private network will protect your internet connection on any device. You connect to a remote server and all your traffic is instantly encrypted. No one can see what you do online, including your ISP, government agencies, advertisers, or cybercriminals. It means that you can connect to a public Wi-Fi without fear of becoming a victim of a man-in-the-middle attack.
Some VPN providers, like NordVPN, even offer subscription plans with protection from malicious sites. Our Threat Protection Pro feature, for example, will block you from entering phishing websites. If you click on a phishing link that takes you to a known malicious site, Threat Protection Pro will automatically restrict your access to it.
Get a VPN for your iPhone and shield yourself from cyber threats with one click.
