How to see and delete your incognito history
Many of us use incognito mode to hide our browsing history, but anyone with extra knowledge and administrator privileges can still find incognito history saved on a device. Fortunately, you can view and delete your private browsing records by flushing the DNS cache.
Table of Contents
Table of Contents
Does incognito mode save your browsing history?
Incognito mode doesn’t save your browsing history, cookies, or other site data. But your device saves your browsing session in its domain name system (DNS) cache even if you use private browsing mode.
Every time you visit a new website, you enter the domain name in your browser. In the background, your browser sends a query to the DNS server requesting the IP address of that domain. It then saves this web address in the local storage, so your device can retrieve it faster the next time you want to visit the same site.
The temporary storage of DNS records on the device is called a DNS cache. It includes domain names with their IP addresses – websites you’ve visited recently on any browser, both with incognito mode enabled and without.
And since DNS queries stay on your device, anyone using the same device can look them up.
If that wasn’t enough, some browser extensions and third-party apps make it possible to track browser history on mobile devices. And entities like your internet service provider (ISP) can log your browsing activities at the network level.
That’s why it’s not enough to understand what incognito mode does or how to turn incognito mode on. Learning how to see and delete your incognito history is handy too. And that’s what this article will help you with.
How to see incognito history
If you use the Windows operating system or macOS, you can view the incognito history of any browser by checking your DNS cache or using browser extensions.
To check your DNS cache, ensure you have administrator privileges on your device and follow the instructions below.
How to view incognito history on a Windows PC
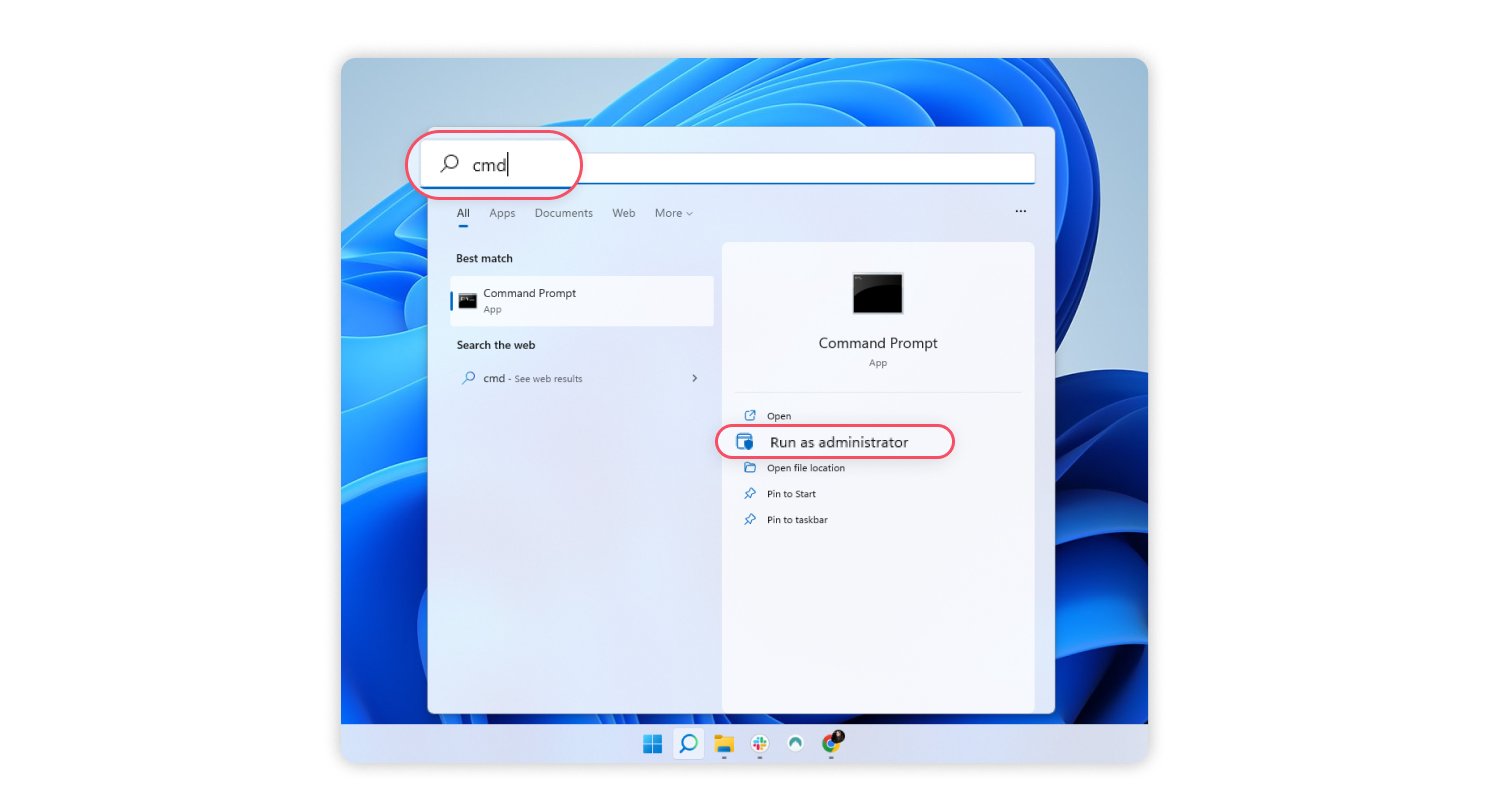
- Find “Command prompt” using the Windows search bar, and choose the “Run as administrator” option.

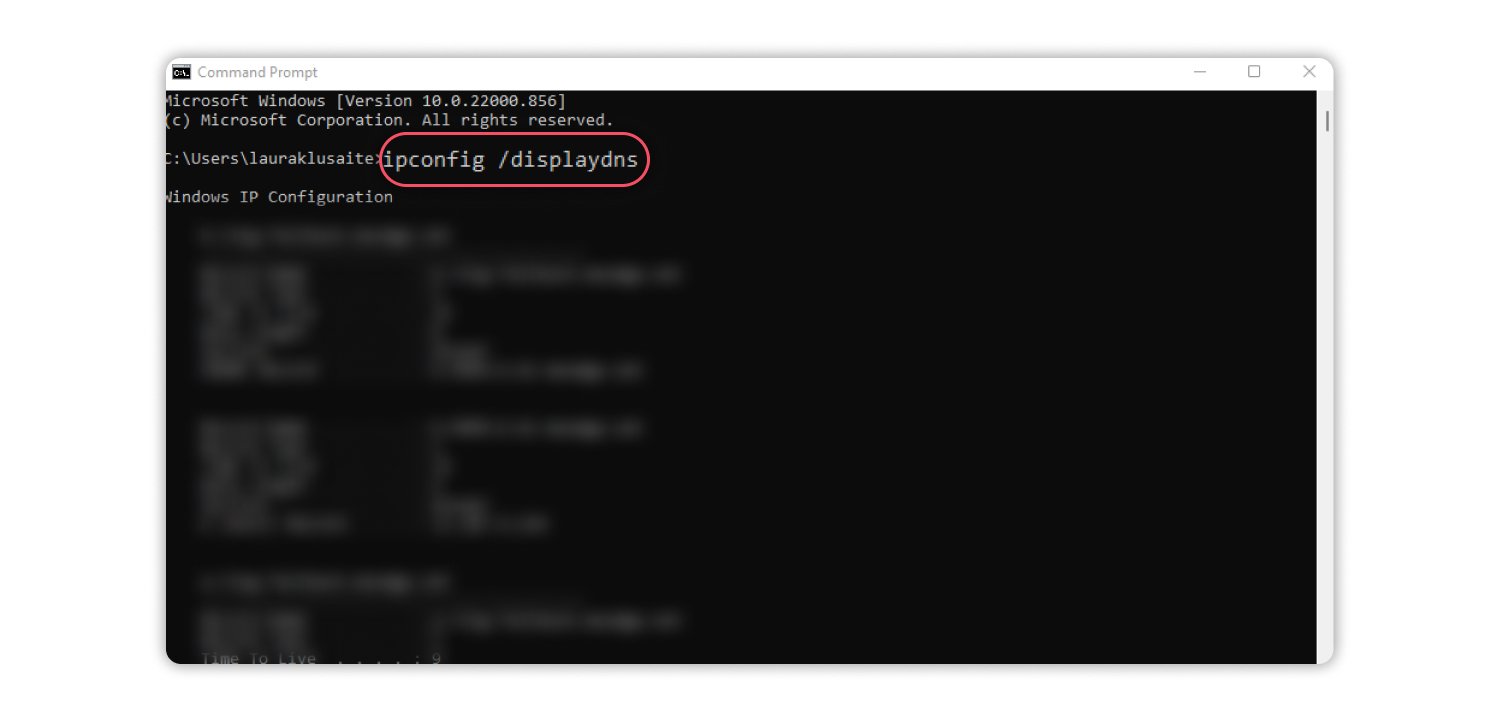
- Type “ipconfig /displaydns” in the “Command prompt” window and press “Enter.”

- You’ll see the list of domains you’ve recently visited on any browser, including the incognito sessions.
How to check incognito history on a Mac
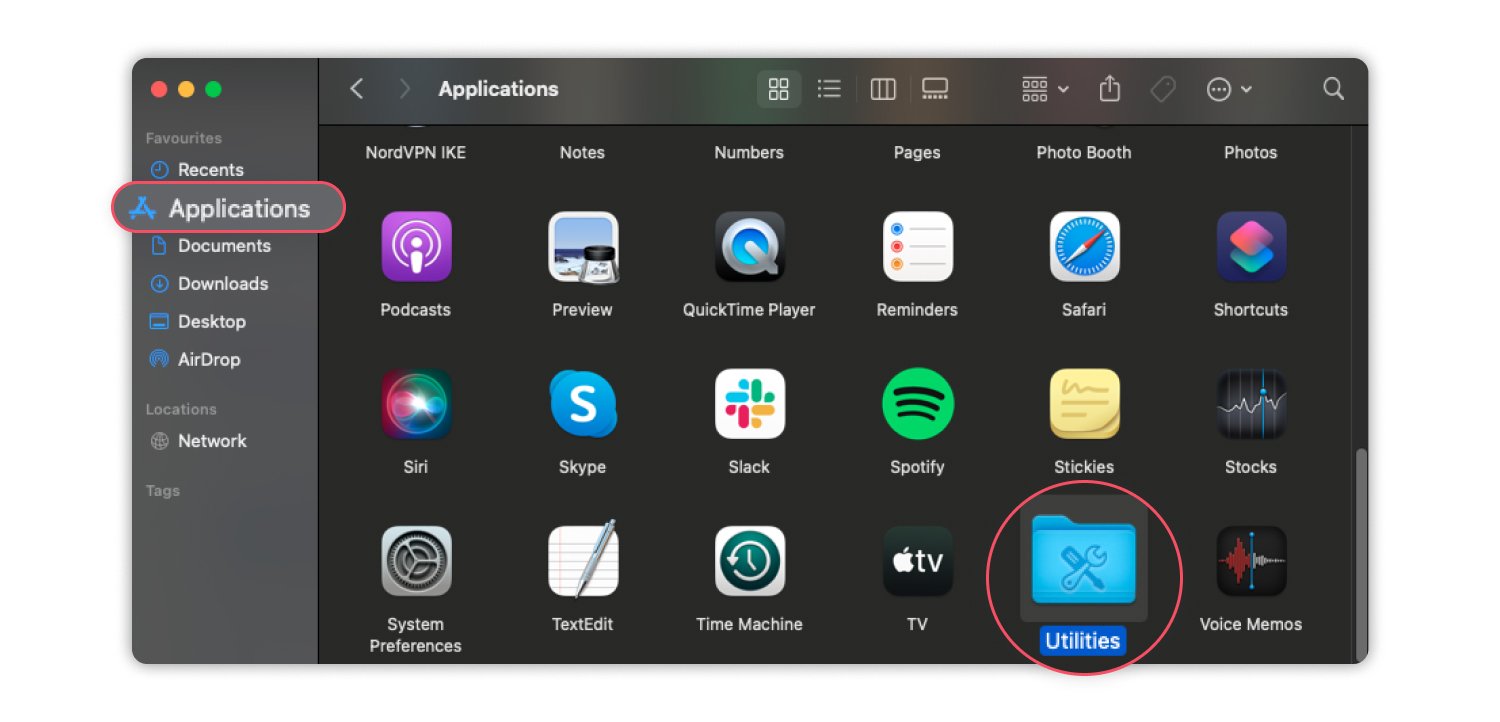
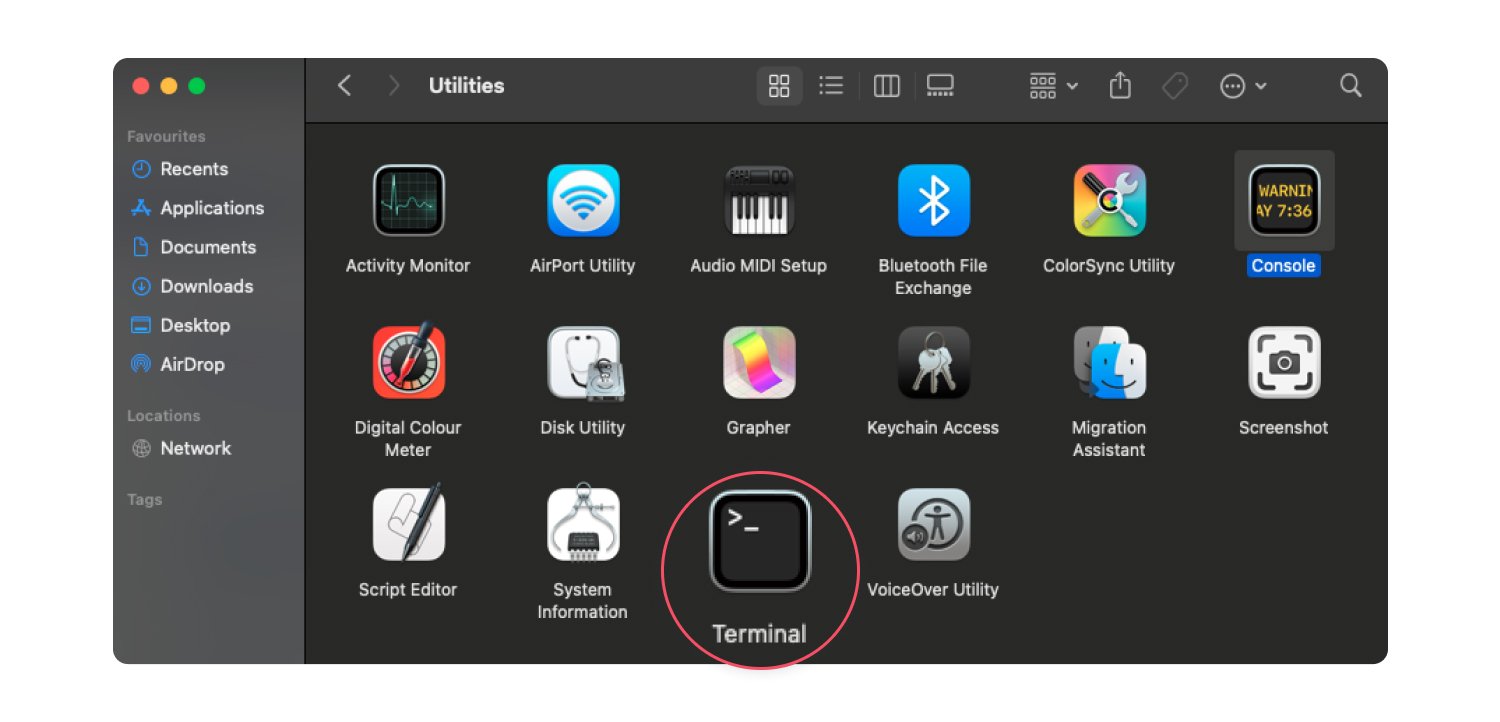
- Open “Applications” and choose “Utilities.”

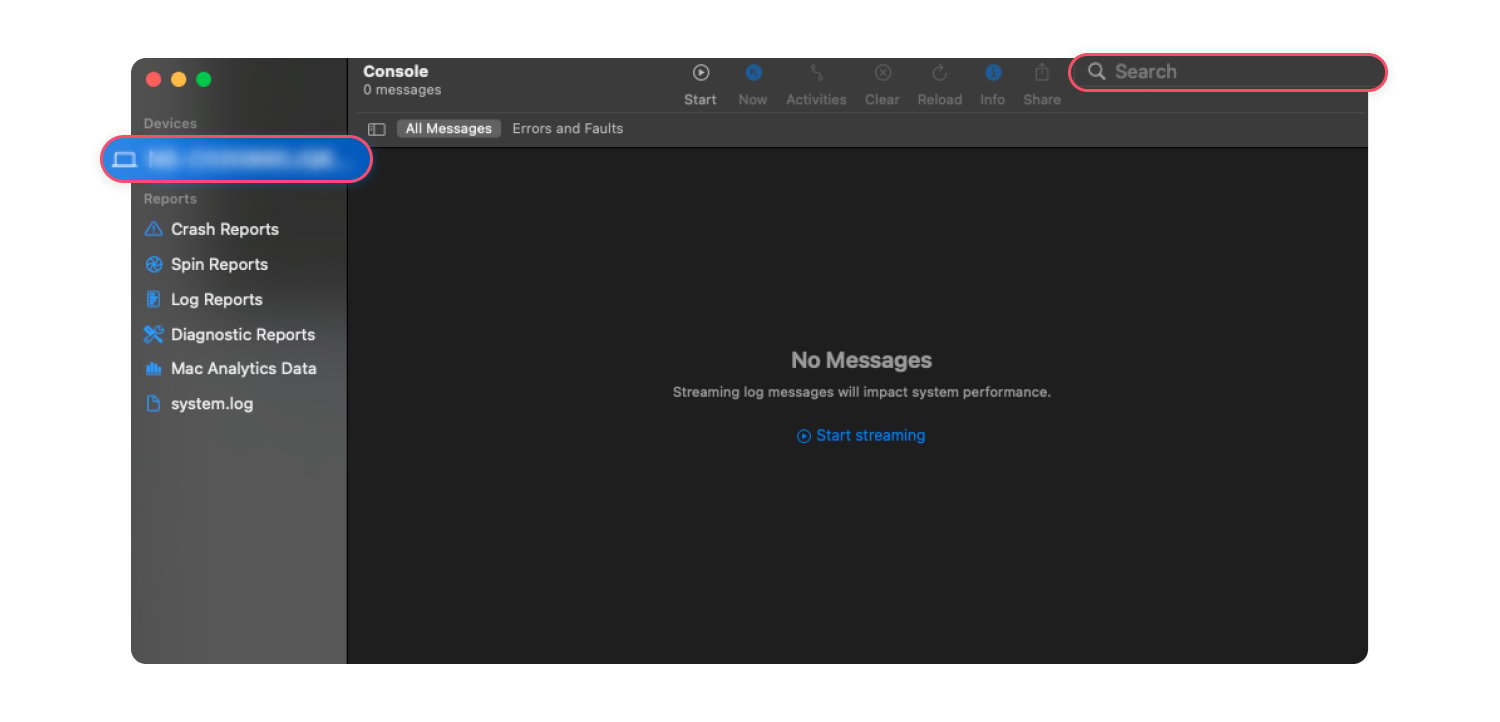
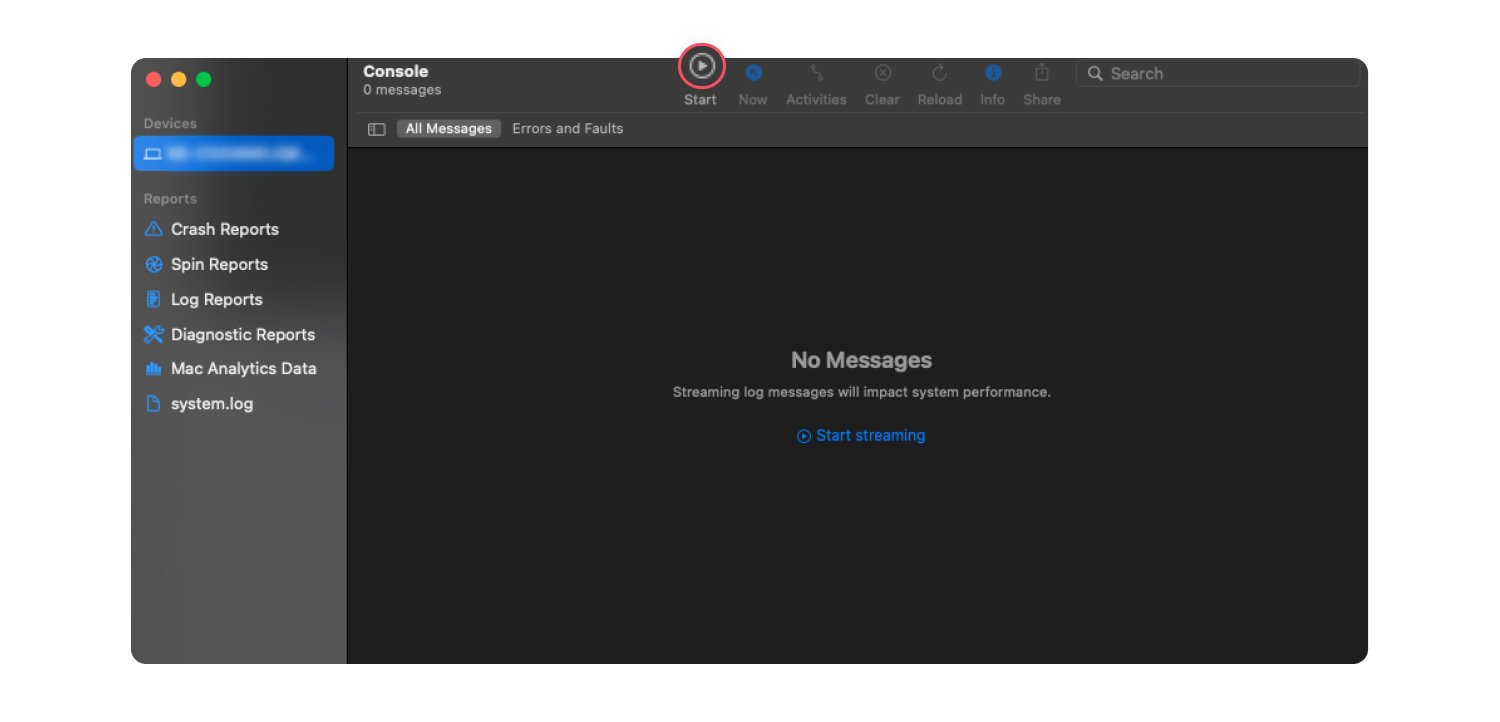
- Double-click to open “Console.”

- Select your device and type “any:mdnsresponder” into the search bar at the top of the window.

- Press the “Play” button that appears in the toolbar.

- Go back to “Utilities” and choose “Terminal.”

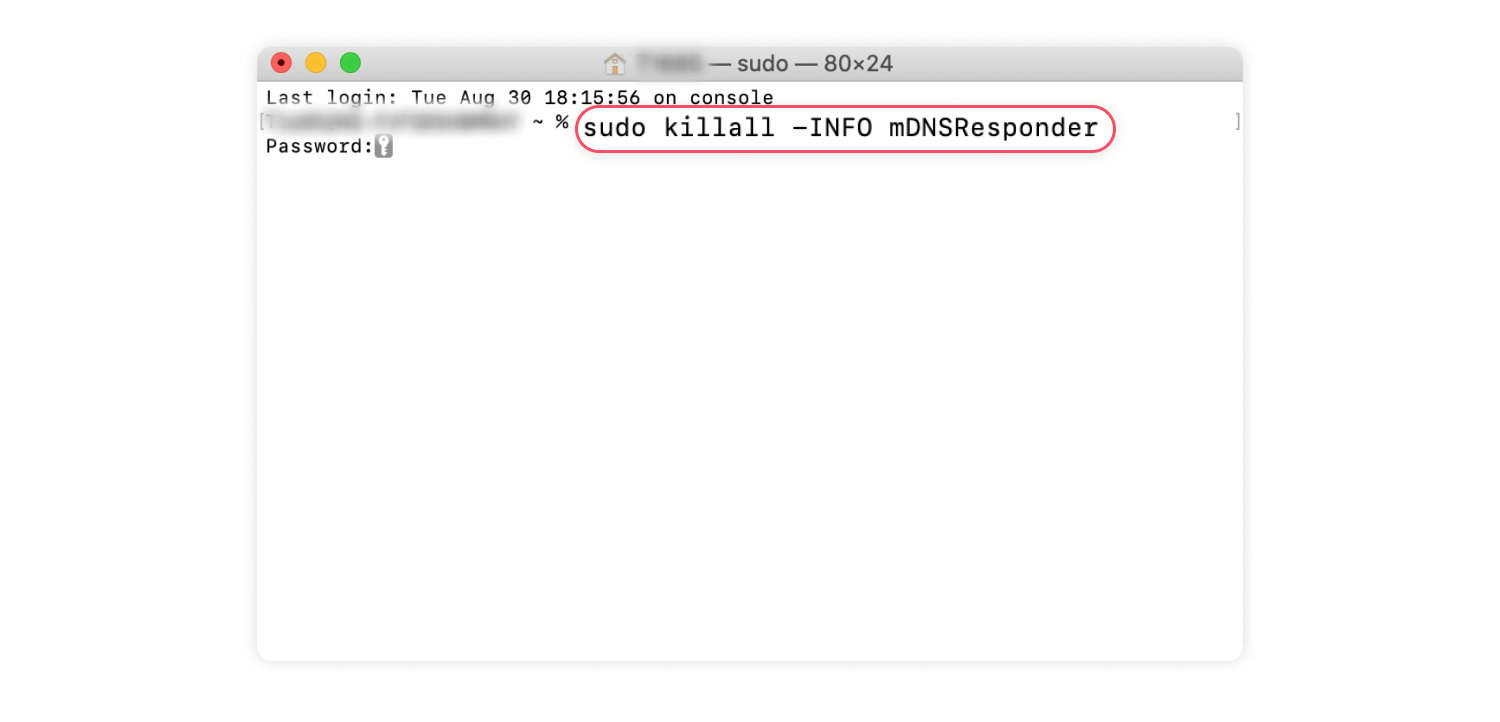
- Type the “sudo killall -INFO mDNSResponder” command into the terminal and press “Enter.” You’ll need to enter your password.

- Go back to “Console” to see your incognito history.
How to see private browsing history with the Chrome extensions
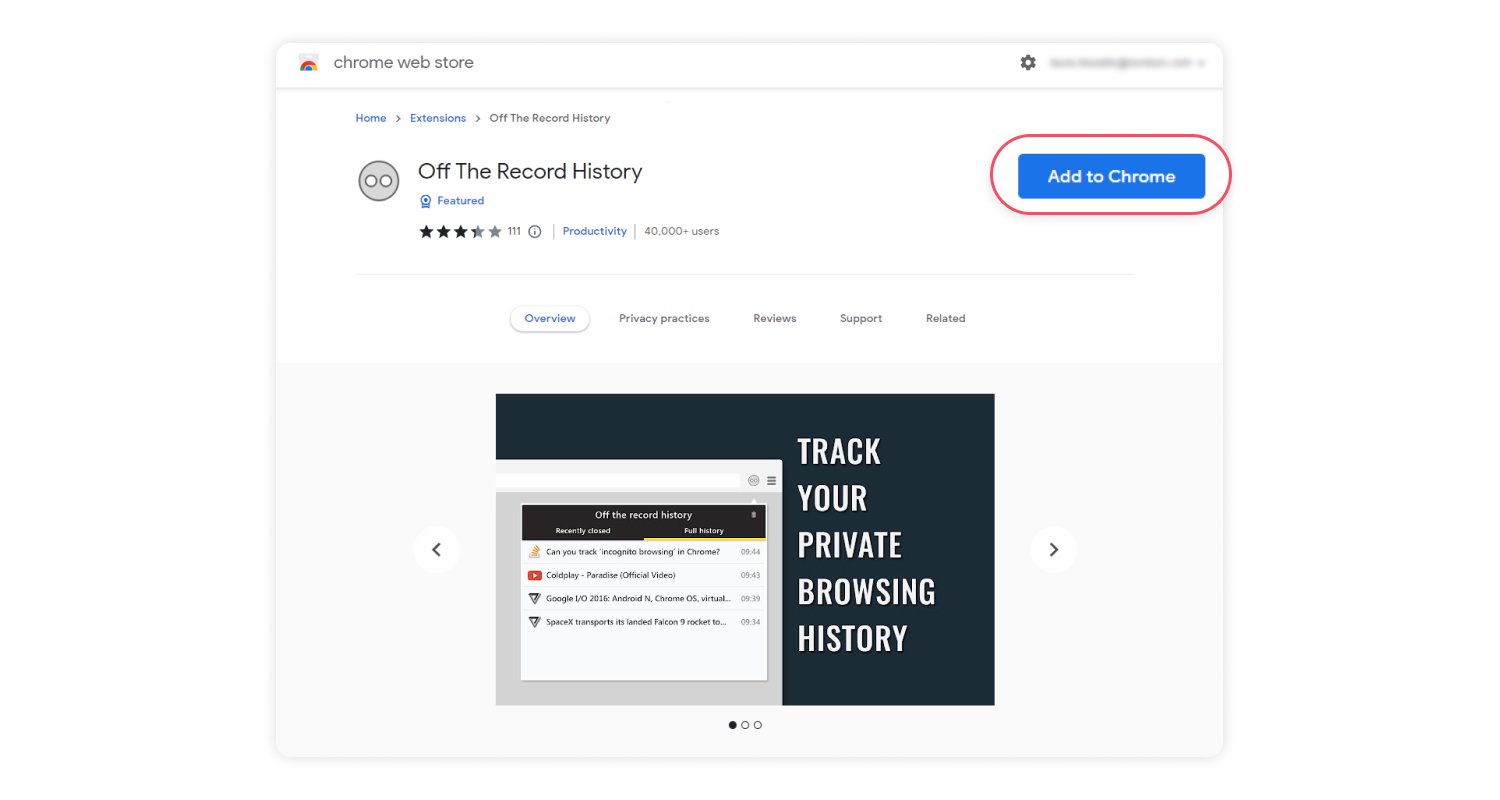
Using the Google Chrome extensions to view your incognito history is convenient when you do some research and don’t want to forget the websites you recently opened in the incognito window. While incognito mode doesn’t save your history at all, such extensions save it until you close the browser.
But checking incognito history retrospectively this way is impossible. You can only start recording it after installing the extension.
To get the extension:
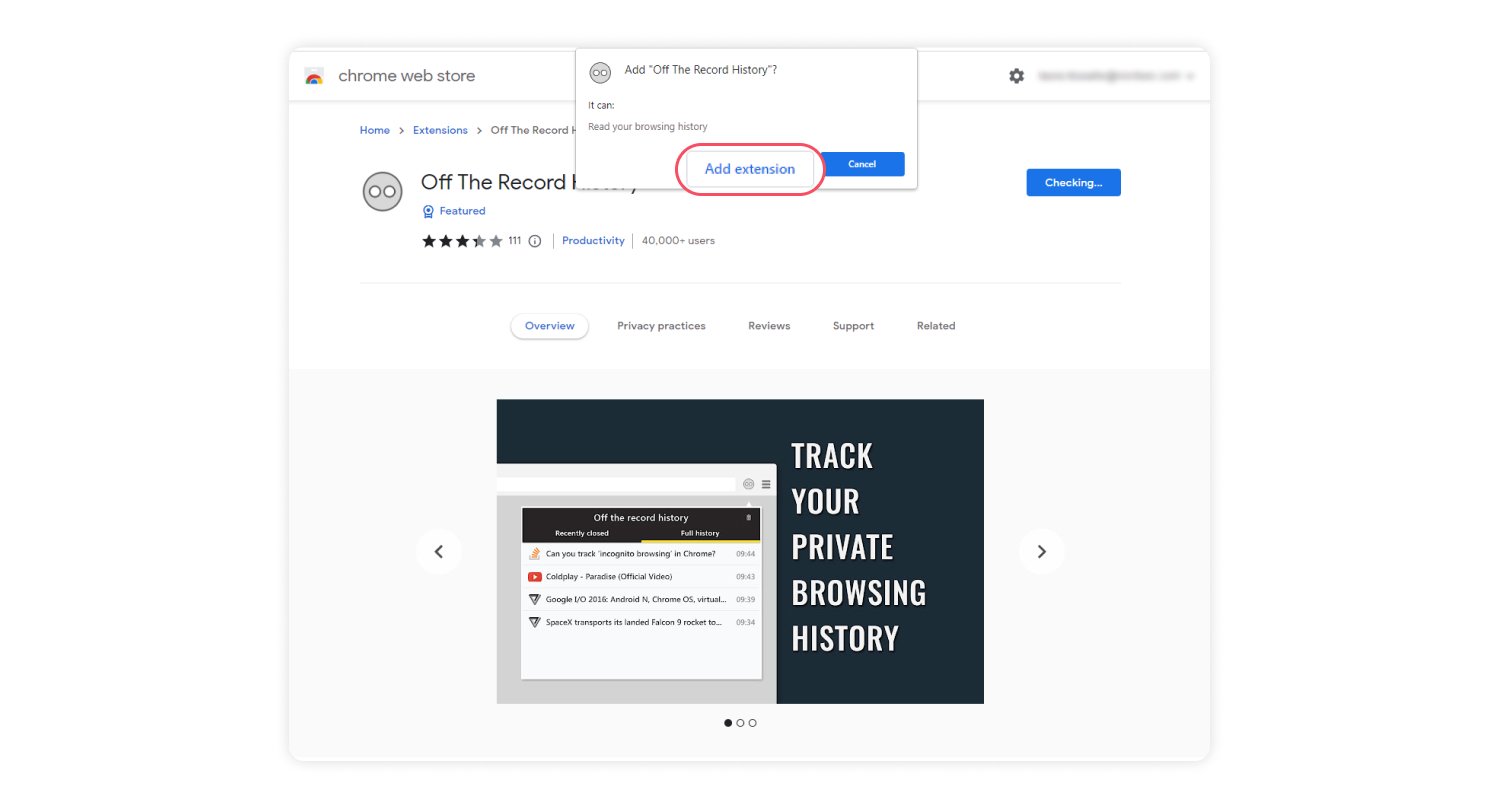
- Find an extension you would like to use in the Chrome Web Store and choose “Add to Chrome.”

- Choose “Add extension” in the new popup window.

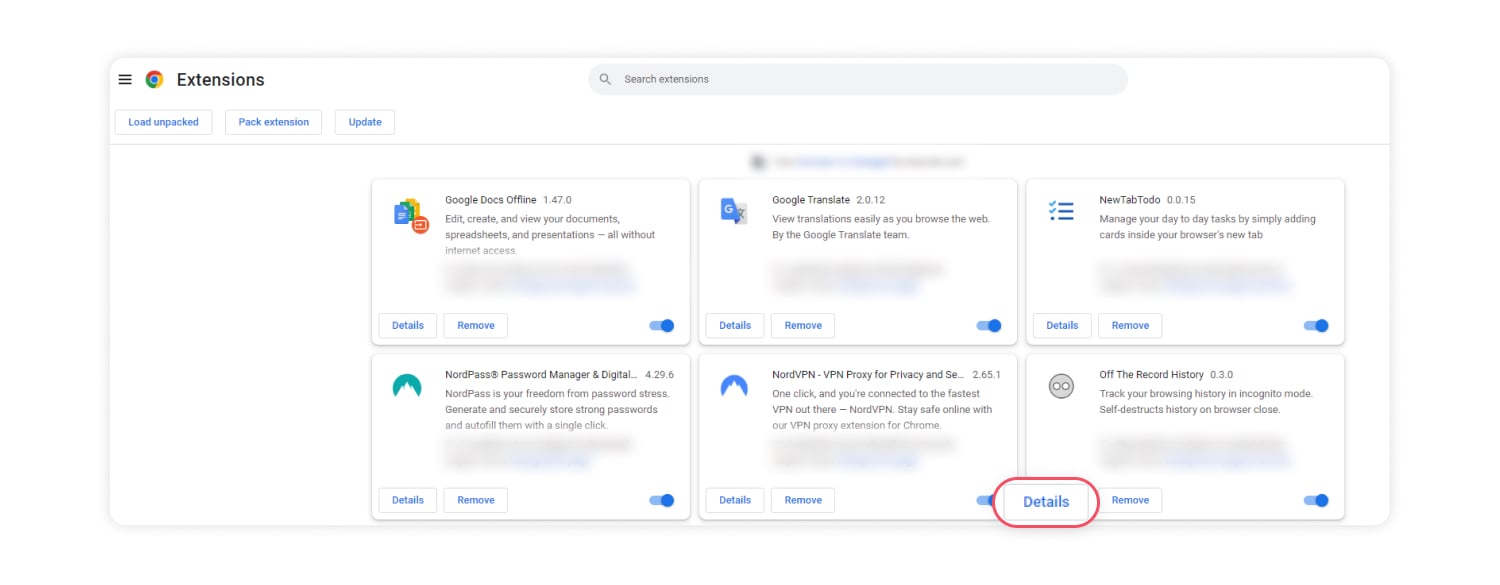
- Go to “chrome://extensions/,’ find the newly added extension, and click on “Details.”

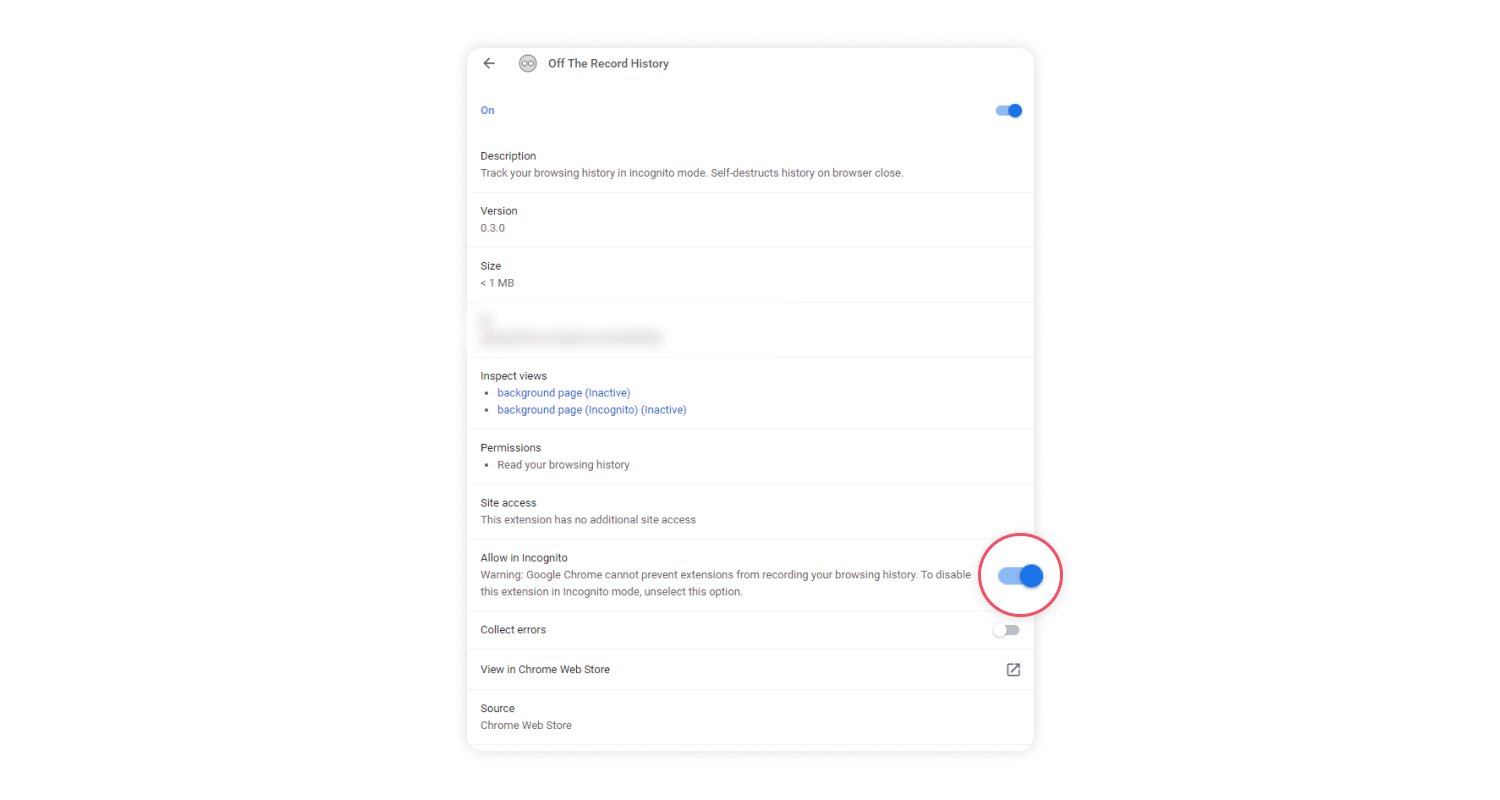
- Switch the “Allow in incognito” button on.

How to see incognito history on an Android device
You can’t view your DNS cache, but you can use third-party apps to see incognito history on Android devices. Many popular parental control apps, such as Hoverwatch, Famisafe, and KidsGuard Pro track incognito browsing.
While you can see the incognito history using these apps, you can’t delete it. And you can’t check the history retrospectively. You can use the app to track future incognito sessions only.
Moreover, parental control apps often track more information than you may like, so use them at your own risk.
How to see incognito history on an iPhone
If your smartphone runs iOS 11 or later, the only way to see your incognito history is to use third-party apps to track it in advance. Like with Android, popular parental control apps, such as ClevGuard, Hoverwatch, and FoneWatcher enable such tracking, but be careful and use them at your own risk.
If your iPhone or iPad has an older version of iOS, open Settings > Safari > Advanced > Website data to see your private browsing history.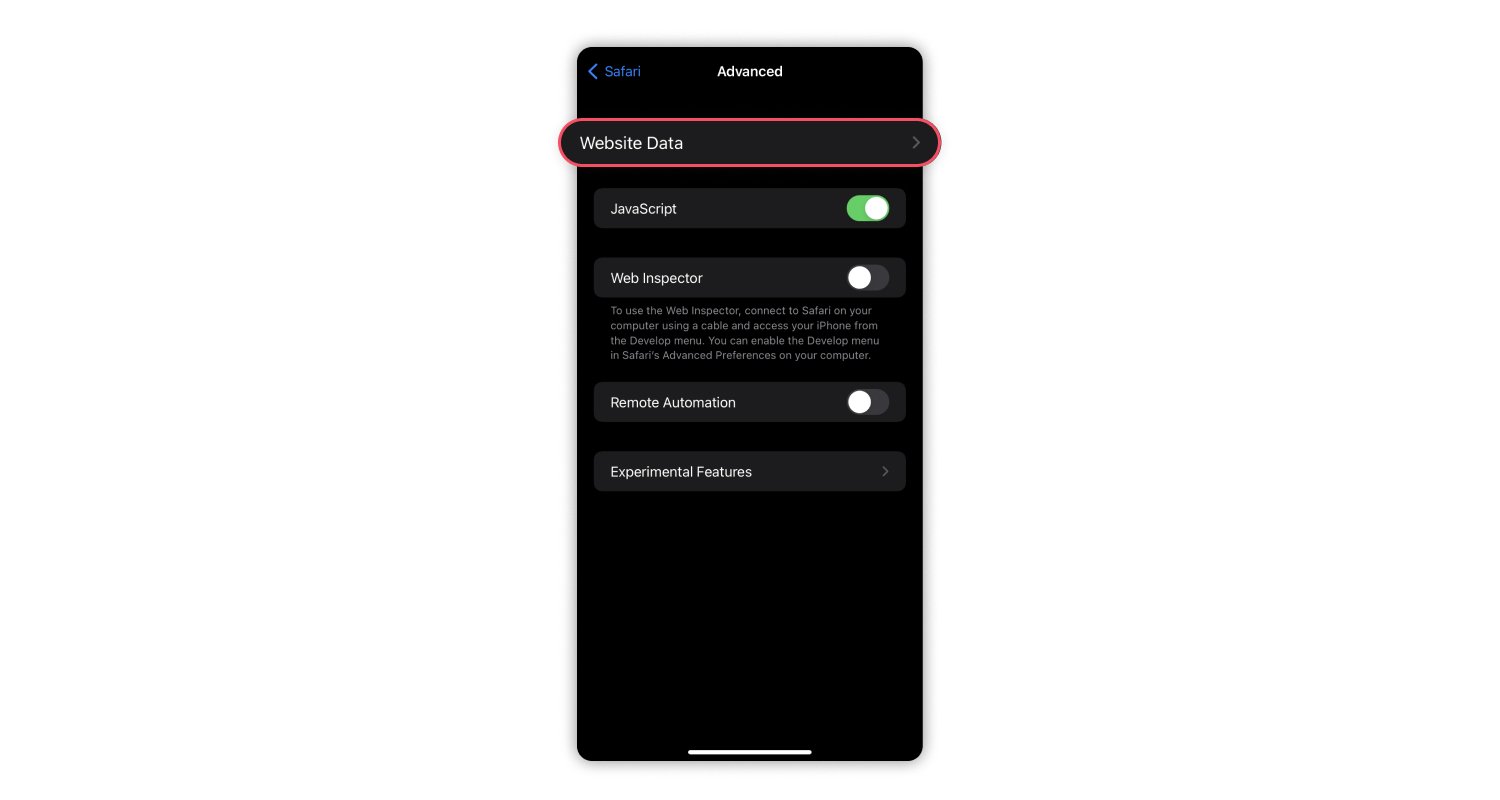
How to delete the incognito history
To clear incognito history from your device, you need to delete your DNS cache. This process is called flushing, and the steps are as follows:
How to delete incognito history on a Windows device
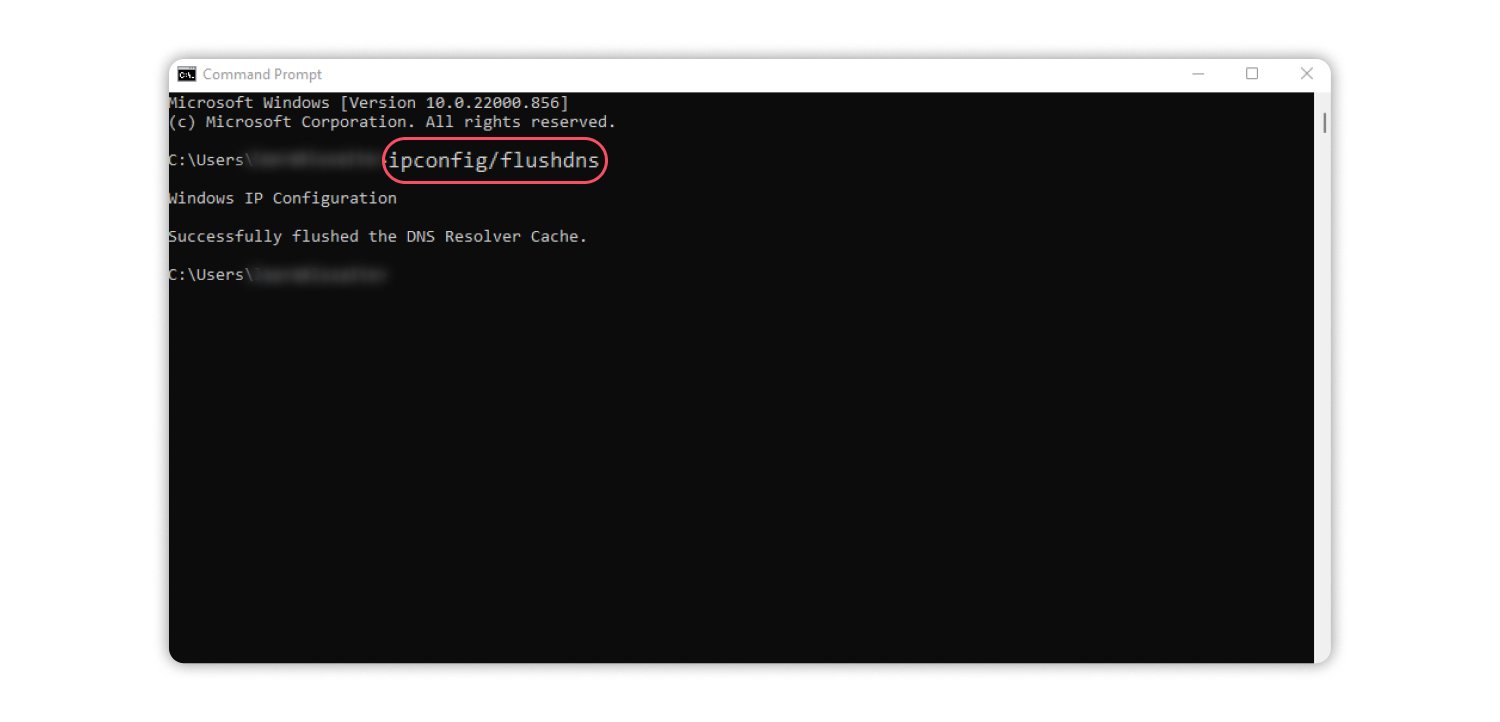
- Find “Command prompt” using the Windows search box and choose the “Run as administrator” option.

- Type “ipconfig/flushdns” in the Command prompt window and press “Enter.”

How to delete incognito history on a Mac
- Open the “Applications” and choose “Utilities.”

- Double-click to open “Terminal.”

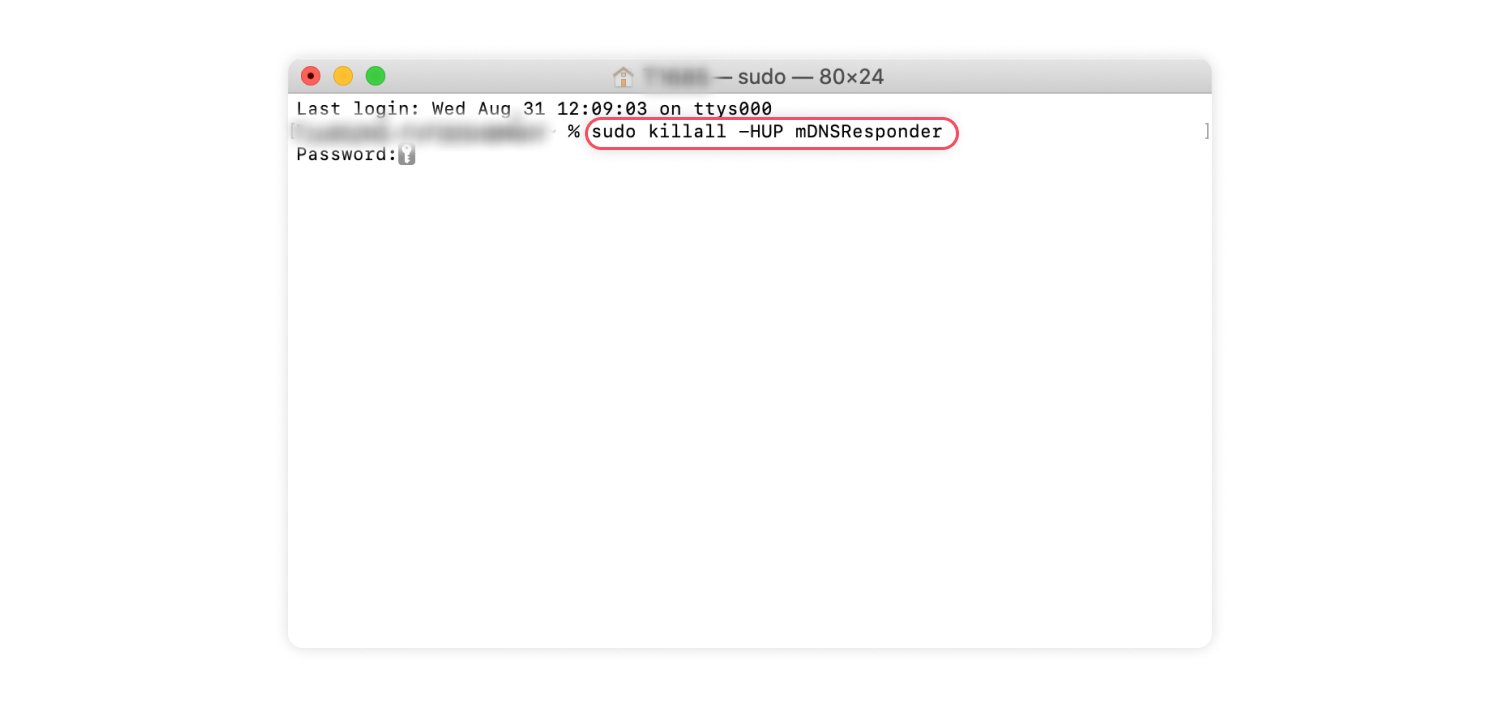
- Type the “sudo killall -HUP mDNSResponder” command into the terminal and press “Enter.” You’ll also need to enter your password.

How to delete incognito history on an Android device
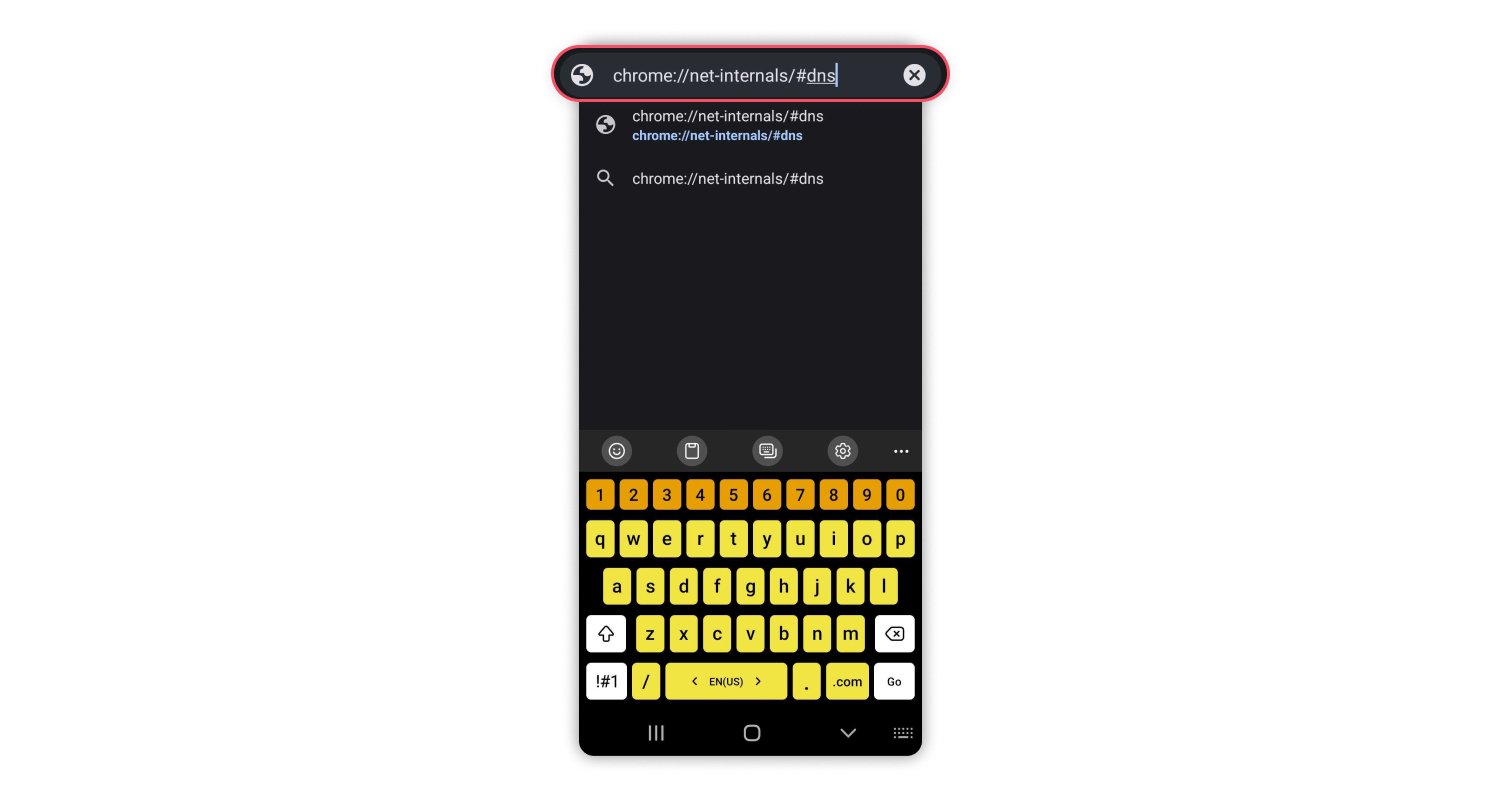
- Open Google Chrome and type “chrome://net-internals/#dns” in the website address bar.

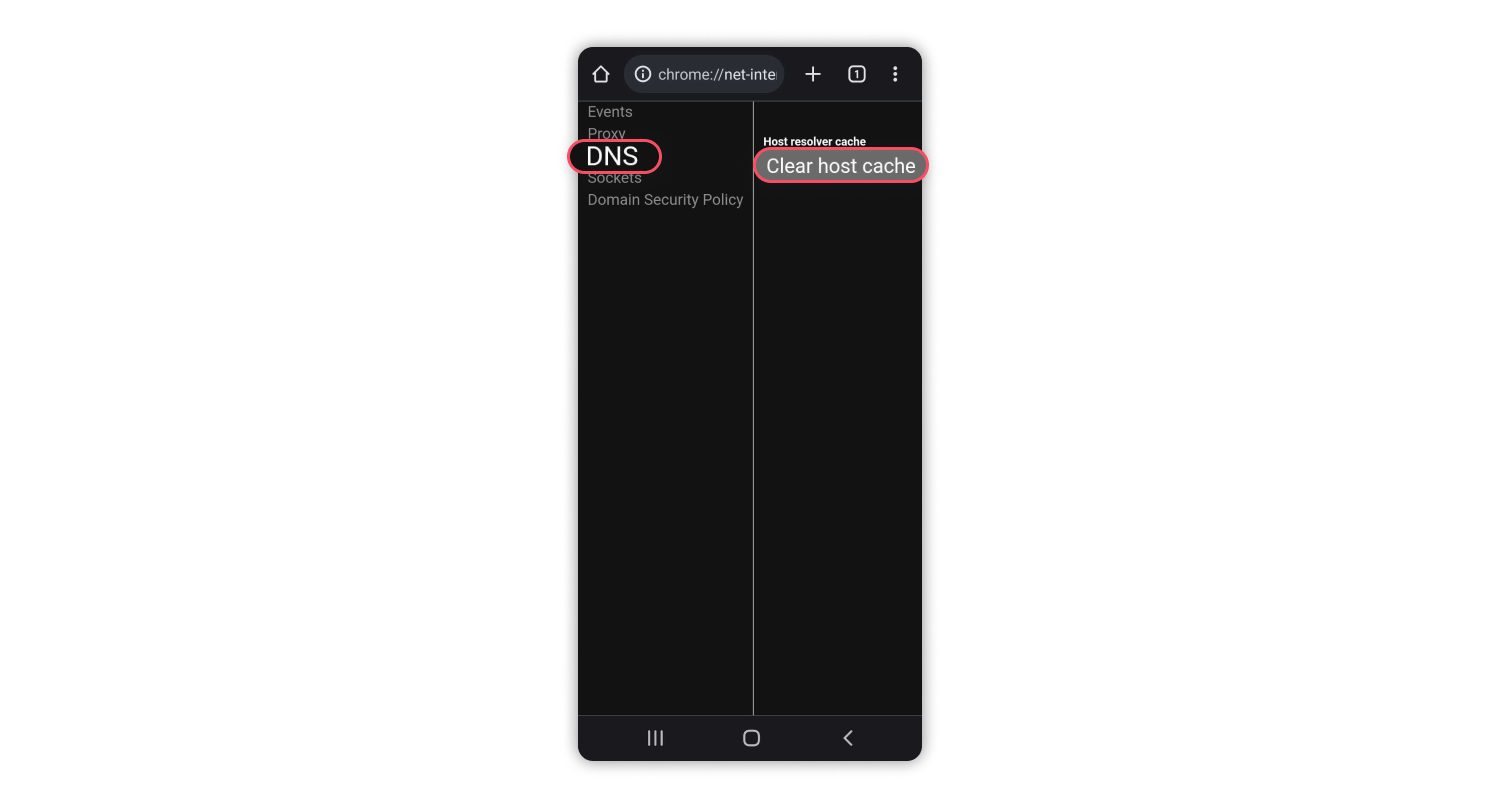
- Click on “Clear host cache” to delete DNS queries.

How to delete incognito history on an iPhone
If you use the Google Chrome browser, follow the same steps for Android phones above.
Another option is to restart your iPhone or enable Airplane mode for a few seconds. It will automatically flush all the DNS records.
How to hide incognito browsing history
The instructions above describe how to delete the traces of incognito browsing from your device. But your incognito history can still be tracked by external parties.
- Your ISP, the government, an employee, or the institution in charge of your network (e.g., your university) could be monitoring the DNS requests your browsers send to DNS servers for a variety of reasons:
- Governments use internet surveillance to enforce censorship and ensure compliance with laws. Authorities also impose ISP tracking for data retention purposes.
- ISPs also track your internet activity to profit from selling your browsing history to advertisers or throttle your internet bandwidth.
- Employees or schools may try to prevent you from visiting social media platforms or inappropriate sites when you’re supposed to be working or studying.
- Websites track your incognito sessions on their site if you log in or come back with the same IP address. The best example is Google – are you aware of how much Google knows about you? It goes far beyond incognito search history.
So, to hide your browsing history, using incognito mode and deleting your incognito history from the DNS cache is not enough because third parties can still track what you do online. But you can use a virtual private network (VPN) too.
A VPN is a service that encrypts your traffic, so third parties can’t track which websites you visit. Your ISP can only see you connect to the VPN server but not what you do online afterward. And since a VPN also hides your IP address, websites can’t recognize you if you return with a different IP address each time. As long as you don’t log in, of course.
NordVPN’s Threat Protection Pro further protects your virtual identity by blocking web tracking and intrusive ads and preventing you from visiting malicious websites. It makes NordVPN the perfect solution for browsing privately and securely every single day.
However, not all VPNs are made equal. Free VPNs often log browsing data for the same reasons that ISPs do. So it is as crucial to choose a reliable VPN provider that doesn’t track your online activity as it is to understand what a VPN is and what it does.
Online security starts with a click.
Browse privately and prevent web tracking with NordVPN.
