How to change DNS
You might want to change your DNS server for multiple reasons — from improving your browsing speed and privacy to accessing restricted content. But first, you have to know how to do it. Read on to find out more about DNS servers and how to change to a different one.
Table of Contents
Table of Contents
What are DNS servers and what do they do?
A DNS (domain name system) server is a computer server that acts as a phonebook for the internet — it translates domain names (like nordvpn.com) into IP addresses (like 103.86.96.100), which are the numerical addresses that computers, mobile phones, and routers use to communicate with each other over the internet. DNS servers make it possible for the traffic to flow between your browser and the server that hosts the information you want to view.
When you type a domain name into your browser’s address bar, the browser sends a request to a DNS server to obtain the corresponding IP address. The DNS server finds the correct IP address and returns it to the browser, allowing the browser to connect to the website’s server and display the website. If you ever wonder “what is my DNS,” you can use various online tools or check your network settings to find out which DNS server your device is using.
ISPs (internet service providers), VPN service providers, businesses, and other organizations operate DNS servers.
Is it good to change your DNS?
You can benefit in several ways by changing your DNS:
- Better speed. If your internet connection is slow due to high traffic going through your current DNS server, you can choose a faster server and improve the speed at which your computer loads websites
- More privacy and security. Your internet service provider (ISP), which is also your DNS provider, may be tracking which websites you visit and how long you spend there, what content you’re viewing, and your IP address. If you change your DNS server, you limit the amount of data your ISP can collect on you. A secure DNS server also offers security features, such as blocking malicious websites and preventing data theft through phishing attacks.
- Censored content. Some governments and ISPs restrict or block access to some websites using DNS servers. In some cases, by changing to a different DNS server, you can avoid these restrictions and view the content you want.
- Better website performance. If you have a website, you have control over the DNS settings for your domain. By managing various types of DNS records, such as A records and MX records, as well as other DNS settings, such as DNS TTL, you can ensure your website resolves correctly and efficiently.
However, changing your DNS can be dangerous, especially if you connect to an unreliable DNS server:
- DNS cache poisoning. It is a type of cyberattack in which attackers corrupt the DNS cache — they compromise and replace data stored in the DNS cache with fraudulent redirects to divert traffic to malicious websites, like phishing sites. They achieve this by tricking the server into accepting incorrect information or exploiting the server’s software vulnerabilities. When you try to access an affected domain, you are redirected to a malicious website that can steal personal information or infect your device with malware.
- DNS spoofing. Sometimes used interchangeably with “DNS cache poisoning,” DNS spoofing is the end result of DNS cache poisoning. It is the redirection of internet users to fake or dangerous websites. Cybercriminals replace the real IP addresses with fraudulent ones to redirect traffic to websites where they steal users’ data, login credentials, and banking information or spy on users and their activity.
- DNS hijacking. In this type of DNS cyberattack, cybercriminals gain access to the servers or users’ devices and change the DNS settings to direct traffic to a specific IP address. If the DNS server you are using has been hijacked, when you type in a URL of a legitimate website, your device is automatically directed to a malicious IP address instead of the one you wanted to access. Once you’ve accessed the malicious website, cybercriminals may try to steal your data, conduct a phishing attack, or install malware on your device.
Which are the best DNS servers?
Most ISPs provide their own DNS servers, but if you are struggling with internet speed or have doubts about your default DNS server security, you might want to choose a third-party DNS server. But first, you have to know which DNS service providers you can trust. Here is a list of the most popular ones:
- Google operates DNS servers with server addresses of 8.8.8.8 and 8.8.4.4. Known for their fast response times and reliability, they are a popular choice among internet users around the world. In addition to their speed, Google DNS also offers DNSSEC (domain name system security extensions) support, which helps to protect against DNS spoofing and other security threats.
- Cisco is another popular DNS provider. It operates OpenDNS servers with server addresses of 208.67.222.222 and 208.67.220.220. They are known for their robust security features, including content filtering and malware protection. OpenDNS also uses a protocol that encrypts DNS traffic to prevent snooping and man-in-the-middle attacks.
- Another popular DNS server is Cloudflare DNS with server addresses 1.1.1.1 and 1.0.0.1. Cloudflare DNS is known for its fast response times and security features, including DNS-over-HTTPS and DNS-over-TLS protocols.
- Comodo Secure DNS is another popular choice. It operates servers with server addresses of 8.26.56.26 and 8.20.247.20. In addition to offering quick response times, Comodo offers security features like DNS redundancy, which is a backup mechanism for DNS outages that helps to protect the users’ data while they browse the internet.
- NordVPN uses private DNS servers with server addresses of 103.86.96.100 and 103.86.99.100. Whenever you connect to any NordVPN server, you automatically connect to NordVPN’s private DNS servers, which prevents DNS leaks during your VPN connection and offers a fast DNS query processing. You can configure your device manually to use private NordVPN DNS servers.
- NordVPN’s SmartDNS, with the following DNS server addresses, is among the best for streaming: 103.86.96.103 and 103.86.99.103. It lets you access specific content on your smart TV that might not be available in your country. SmartDNS is integrated into the NordVPN’s SmartPlay feature, so all you have to do is turn on the VPN service to access it.
When choosing a DNS provider, you should consider both speed and security. While speed is important for a smooth browsing experience, security features like DNSSEC and content filtering can help protect against online threats. You should test different DNS providers to see which one offers the best performance and security and choose either your ISP’s DNS servers or a public DNS address.
Fast and secure third-party DNS servers
| DNS service provider | Primary DNS | Secondary DNS |
|---|---|---|
| 8.8.8.8 | 8.8.4.4 | |
| Cisco OpenDNS | 208.67.222.222 | 208.67.220.220 |
| Cloudflare DNS | 1.1.1.1 | 1.0.0.1 |
| Comodo Secure DNS | 8.26.56.26 | 8.20.247.20 |
| NordVPN DNS | 103.86.96.100 | 103.86.99.100 |
| NordVPN SmartDNS | 103.86.96.103 | 103.86.99.103 |
Google also offers public DNS addresses for internet protocol version 6 (IPv6) (2001:4860:4860::8888 and 2001:4860:4860::8844) that you can configure on your device. However, even though the IPv6 address standard was intended to supplement and eventually replace IPv4, it’s not without limitations. Creating a smooth transition from IPv4 to IPv6 is tricky and time-consuming, and IPV6 is not available to devices that run IPv4, so users are reluctant to convert to IPv6. Take into account these limitations before opting for IPv6.
How to change your DNS server on a Windows 10
1. Right-click the network icon (or the Wi-Fi icon) in the taskbar notification area and select “Network and internet settings.”
2. Choose “Change adapter options.”
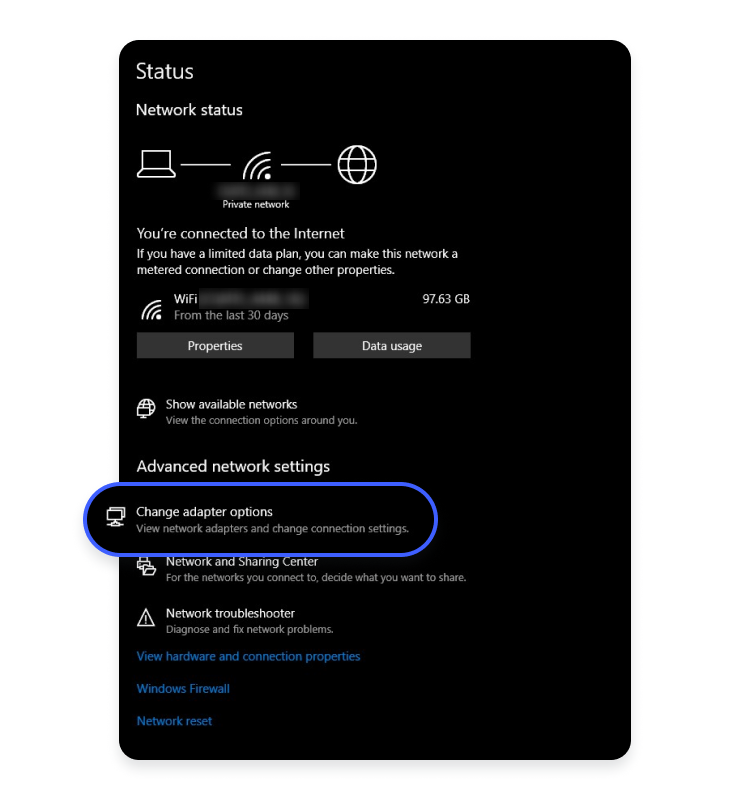
3. Right-click on either “Ethernet” or “Wi-Fi,” depending on which one you are using, and choose “Properties.”

4. Select “Internet Protocol version 4 (TCP/IPv4)” and click “Properties.”
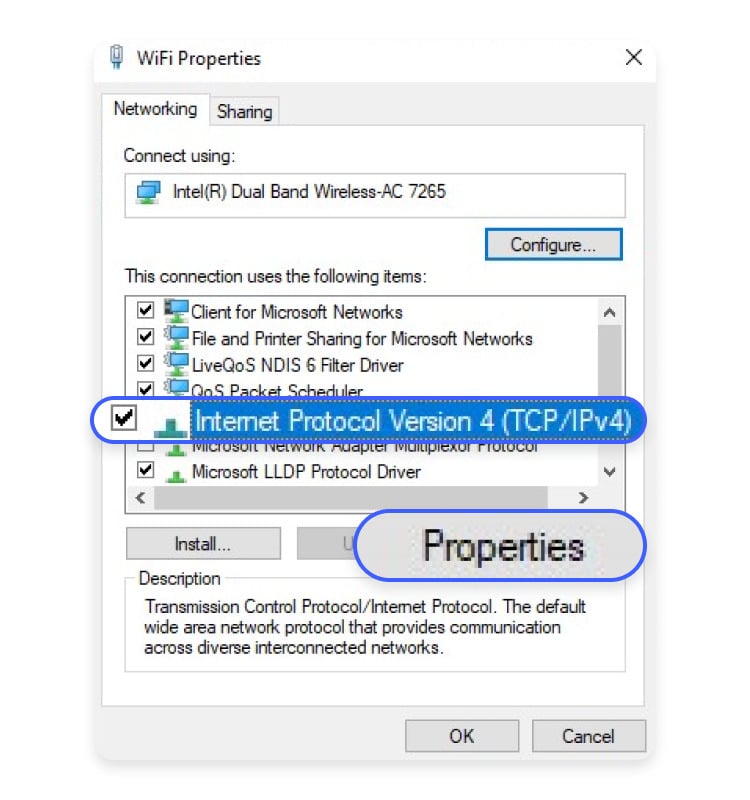
5. Select “Use the following DNS server addresses” and enter the primary and secondary addresses of your choice.
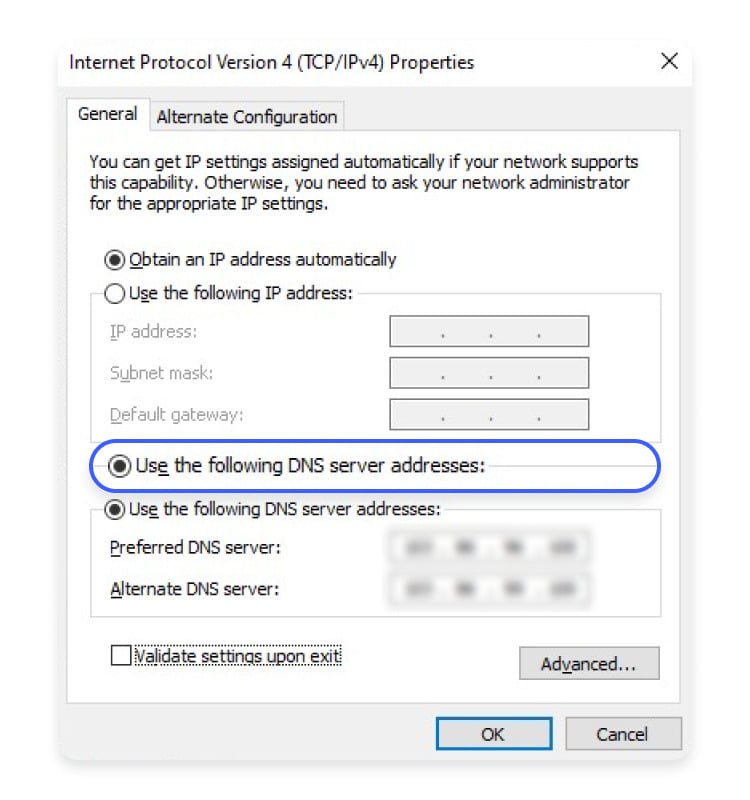
That’s it! You’re all set.
How to change your DNS server on a Windows 11
1. Find the magnifying glass icon at the bottom of your computer screen and click on it.

2. When a window with a search bar appears, type in “Manage network adapter settings” and open the matching result.

3. Find either “Ethernet” or “Wi-Fi,” depending on which one you are using, and click on it. More details will appear, including the option to “View additional properties.” Click it.

4. Next to “DNS server assignment” press the “Edit” button.

5. In the small pop-up box, select “Manual.”
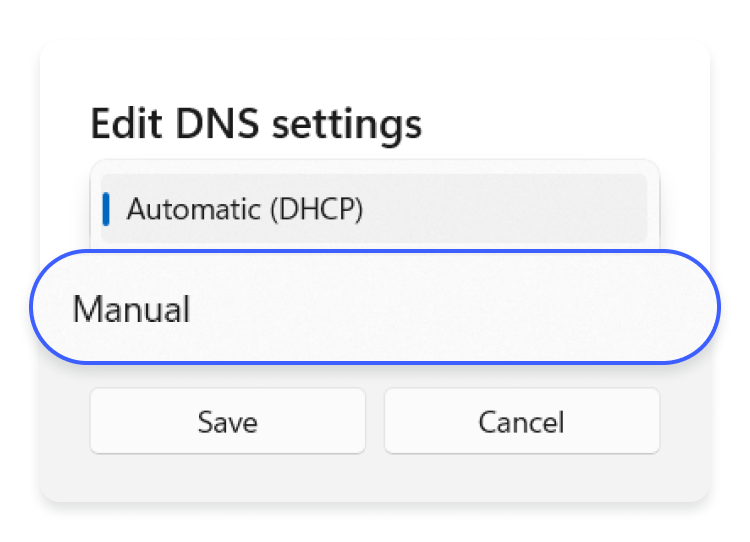
6. Now, adjust the settings as follows:
“IPv4” turned “On”
Preferred DNS: [type in the primary DNS address]
Alternate DNS: [type in the secondary DNS address]
“IPv6” turned “Off”

7. Click “Save.” And you’re done!
How to change Your DNS server on a Mac
1. Go to “System preferences” and click on “Network.”

2. Select the network interface you are using and tap “Details.”
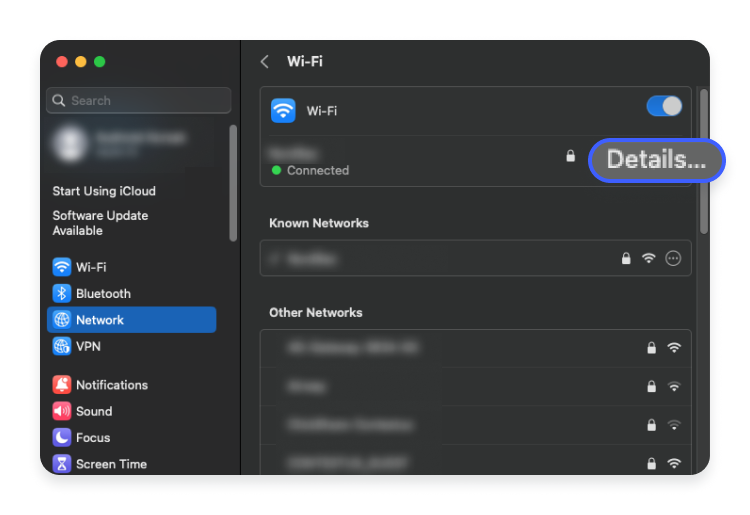
3. Open the “DNS” tab and click the “+” button at the bottom, then add the DNS server addresses of your choice.

You’re all set!
How to change Your DNS server on Linux
1. Press “Ctrl + T” to open the terminal.
2. Enter the following command to become the root user:
su

3. Having entered your root password, run these commands:
rm -r /etc/resolv.conf
nano /etc/resolv.conf

4. When the text editor opens, type in “nameserver” and the preferred DNS server addresses:
nameserver [primary DNS server address]
nameserver [secondary DNS server address]

5. Close and save the file. You can do so by clicking “Ctrl + X” and pressing “Y.” Then type in the terminal:
chattr +i /etc/resolv.conf
reboot now

Congratulations! You are now using the servers of your choice.
How to change Your DNS server on an Android phone
1. Open your device’s “Settings.”
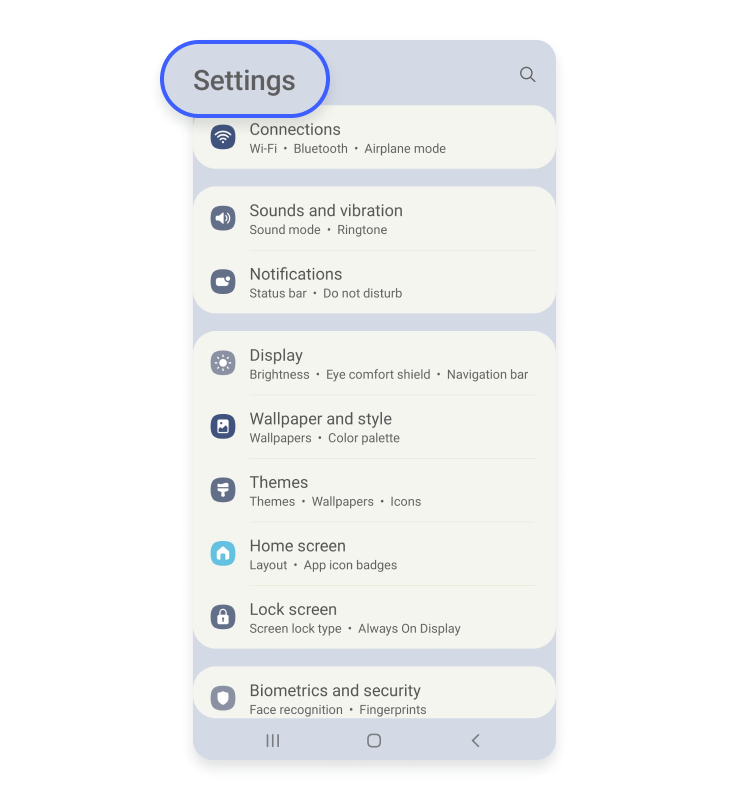
2. Go to “Connections” and choose “Wi-Fi.”
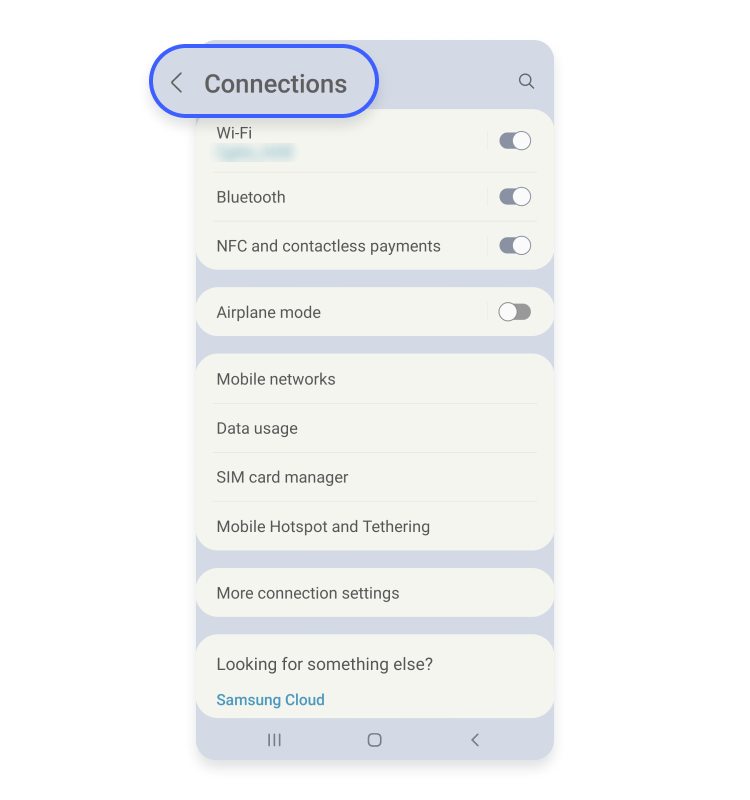
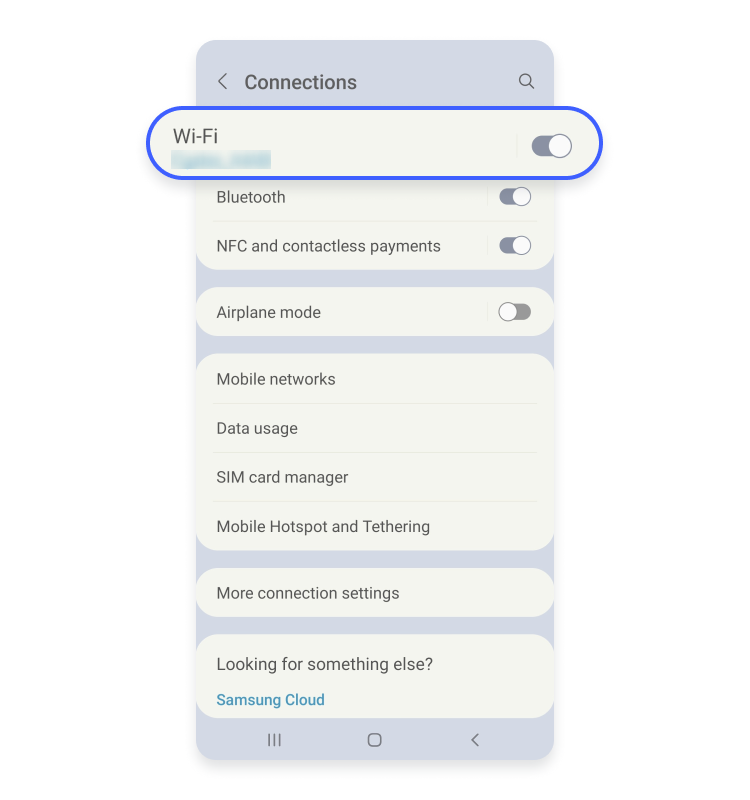
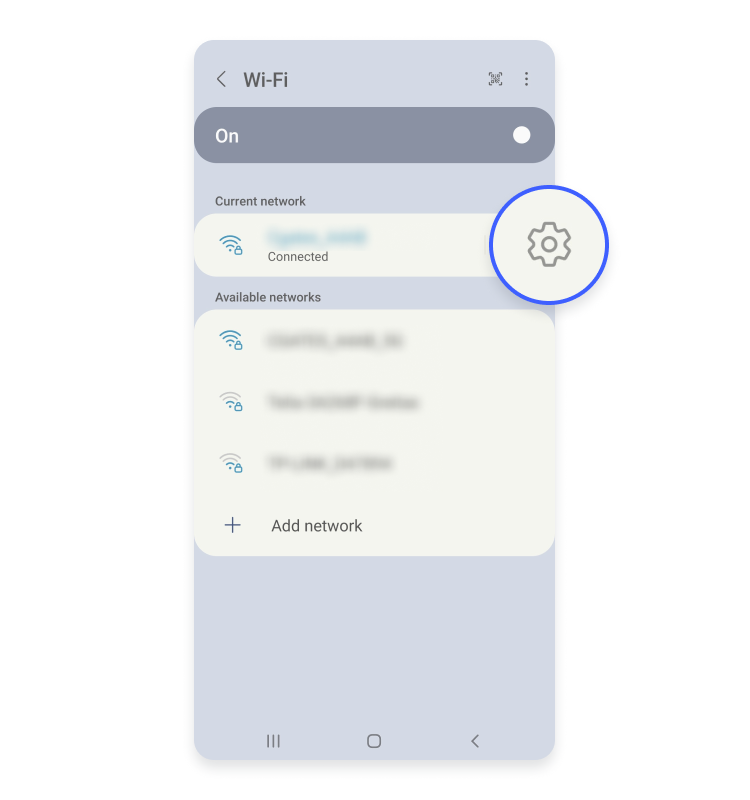
3. Find the “Current network,” tap the cog icon and press “View more.”
4. Change your “IP settings” to “Static.”


5. Scroll down to the “DNS 1” and “DNS 2” fields that appear and enter your chosen DNS addresses. Tap “Save.”

6. Disconnect from the network, then reconnect for the changes to take effect.
How to change Your DNS server on iOS
1. Open your device’s “Settings.”
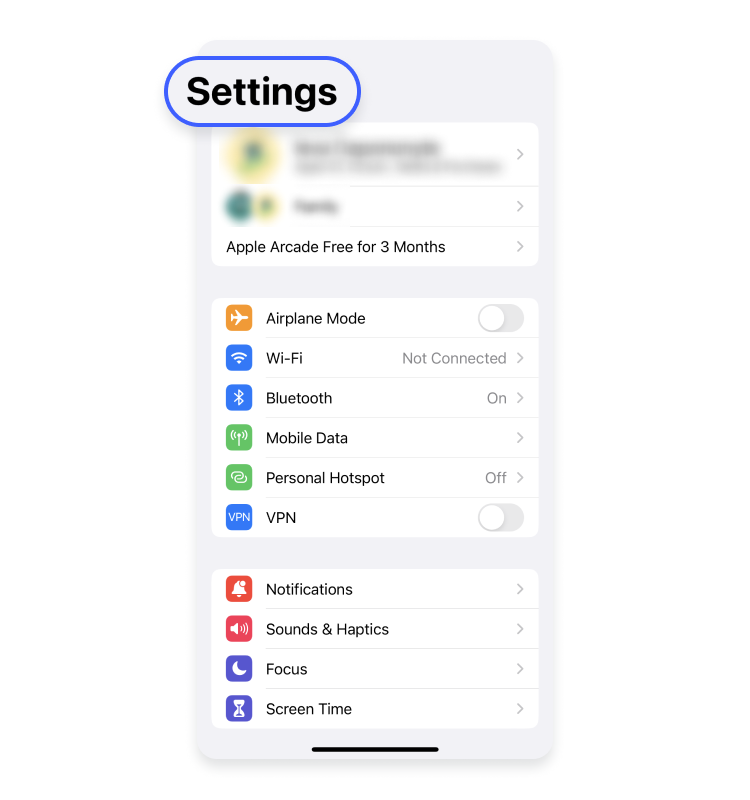
2. Tap on “Wi-Fi.” You’ll have to turn it on if it’s been switched off.

3. Choose a Wi-Fi network and tap on the blue “i” icon.

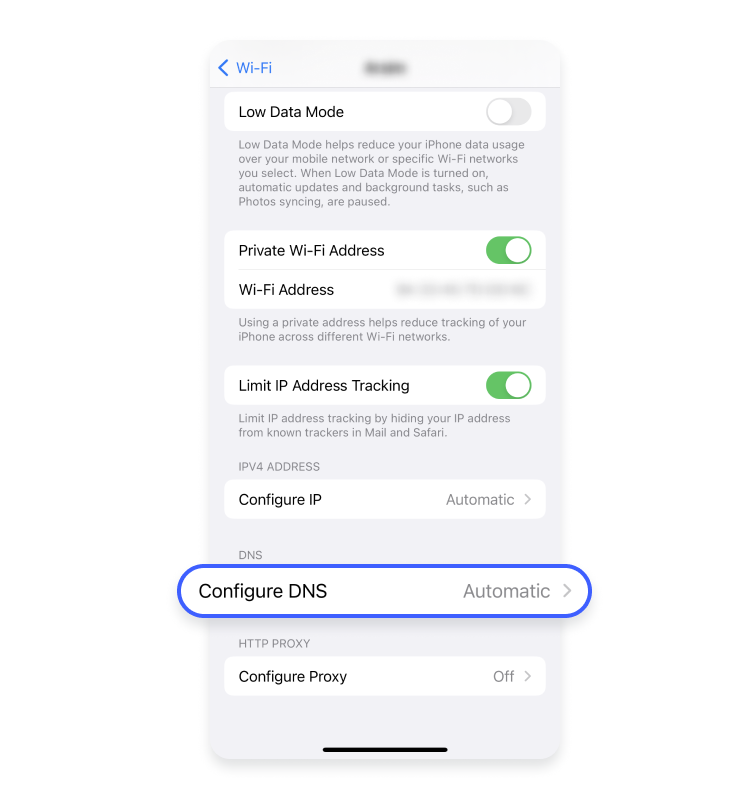
4. Then tap “Configure DNS” and select “Manual.”
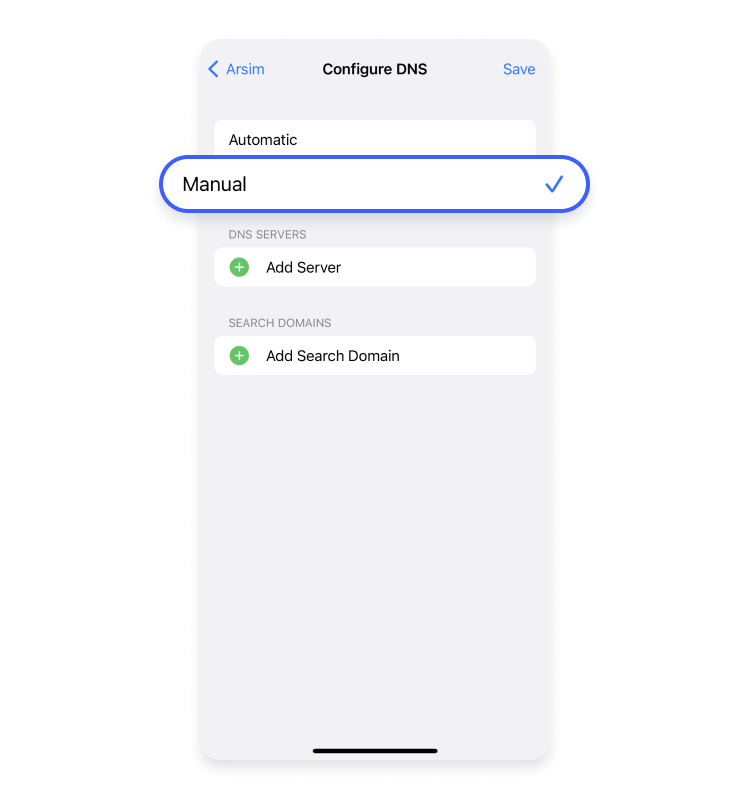
5. Tap “Add server” and add the DNS addresses of your choice.

How to change your router DNS server
You may want to change your router’s DNS settings to improve internet connection speed, security, and efficiency. By default, your router uses DNS servers operated by your ISP. All the devices connected to your network use the same DNS servers that your router does, which means that by changing DNS server settings on your router, you also apply the same configuration to every device on your network. So let’s see how it’s done.
Changing DNS server for Asus routers
1. To access your router’s admin page, type “http://192.168.1.1” into your browser’s address bar.
2. Select “WAN” from the left-side menu and click the “Internet connection” tab.
3. Scroll down to “WAN DNS setting” and change the setting “Connect to DNS server automatically” to “No.”
4. Enter your preferred primary and secondary DNS server addresses in the “DNS server 1” and “DNS server 2” fields.
5. Click “Apply” to save the new settings.
Changing DNS server for NetGear routers
First, you need to find the default gateway IP address of your specific router. Type “cmd” into the search field on your desktop taskbar to open “Command Prompt,” enter “ipconfig,” and find the string of numbers listed next to “Default gateway.” Having found your router’s default gateway IP, follow these steps:
1. Enter the default gateway IP address into your browser to sign in to the NetGear web interface.
2. If your NetGear interface has both “Basic” and “Advanced” tabs displayed at the top of the page, select “Basic” and click on “Internet.” If it only has the “Basic” tab, just click “Settings.”
3. Under the DNS address, select “Use these DNS servers.”
4. Enter your preferred primary and secondary DNS server addresses in the “Primary DNS” and “Secondary DNS” fields.
5. Click “Apply” and restart your device if prompted. And you’re good to go!
Changing DNS server for Linksys routers
1. To sign in to your Linksys router’s web interface, type “http://192.168.1.1” into your browser’s address bar.
2. Click “Setup” on the main menu and select “Basic setup.”
3. Enter your preferred primary and secondary DNS server addresses in the “Static DNS 1” and “Static DNS 2” fields.
4. You can add a different DNS server address in the “Static DNS 3” field, or you can leave that field blank.
5. To save the new settings, click “Apply” at the bottom of the screen.
Another way to make your connection and online traffic more secure is to set up a VPN on your router. You may use up to a total of 10 devices simultaneously with one active NordVPN subscription. However, you can configure your router with a VPN connection to cover your whole household, while using only one of the 10 available slots.
Change DNS servers using NordVPN
If you are looking for a secure DNS connection, NordVPN’s servers are the right choice. By default, NordVPN offers private DNS in its native apps, but you can also configure your devices manually to use secure DNS server addresses. You should do so if you are connecting to NordVPN from a non-native app or are having problems setting up DNS addresses in the app. You can find the detailed instructions on how to configure NordVPN DNS addresses on different devices by visiting our support page on connectivity and typing “DNS” in the search bar.
Test your new DNS settings
Now it’s time to try out your new DNS settings by doing a DNS leak test. Simply go to the DNS leak test website and choose either a standard or extended test.
If you are using a VPN, your online traffic, including DNS queries, should be routed through the VPN network. A DNS leak test works by sending a number of domain names for the VPN to resolve. If at least one of the servers in the results belongs to your ISP, the VPN probably has a DNS leak. However, if the test displays DNS servers that don’t belong to your ISP, your traffic is secure.
Want to read more like this?
Get the latest news and tips from NordVPN.

