What is the DNS, and how does it work? A comprehensive guide
The DNS (domain name system) is a unified service that assigns an IP address to a domain name and is a fundamental building block of online communications. The DNS effectively acts like an address book for the internet, using DNS name servers (also referred to as DNS servers) to find and allow you access to websites. Here’s a step-by-step guide on how the DNS and its name servers work.

Table of Contents
Table of Contents
What are the DNS and name servers?
A DNS server is a computer system that translates domain names (like www.example.com) into IP addresses (like 192.0.2.1). When a user enters a domain name into their browser, the browser sends a request to a DNS name server, requesting an IP address that can be used to connect to the web server hosting the website.
When you want to access a website, you type a URL address in your browser. The domain name system then translates that URL address into an IP address, the main identifier used to access the site you’re looking for.
How does the DNS work?
The main purpose of the DNS is to translate domain names into IP addresses so that browsers can locate and load the right web pages. To do that, your browser sends DNS lookup requests to specific DNS name servers. This process starts when you type a URL into the address bar on your browser.
Here is a step-by-step breakdown of the DNS lookup process from initial URL input to DNS resolution:
- A user enters the domain name into a browser’s URL bar.
- Once prompted, the browser sends a message to the DNS client to query which network or IP address the domain name belongs to.
- A DNS resolver (also known as a DNS recursor) receives the DNS query and then continues to look for different types of DNS records (or name servers). If the recursive server doesn’t have the necessary IP data stored in a DNS cache, it will send forth more queries to a root name server or a top-level domain (TLD) name server.
- Root name servers and TLD name servers will receive the queries and work in tandem to narrow down the location of the correct IP address details.
- The final data point is the authoritative name server, which hosts the exact domain-IP details.
- The authoritative server sends back the IP address information to the recursive resolver, which gives the browser the correct IP address to visit. DNS resolvers cache DNS records for easier access the next time the user wants to visit the website in question.
While it sounds like working through four different servers would be time-consuming, DNS lookup happens instantly.

Types of DNS server
The DNS relies on DNS servers, which fall into four categories.
- Recursive DNS server. A recursive domain name server, or DNS resolver, is created to react and respond to DNS queries and is able to track down the records needed to find the correct root nameserver. It works as a gateway to handling the entire process of querying multiple DNS servers (such as root, TLD, and authoritative name servers) and returning your DNS queries.
- Root server. If a recursive server cannot resolve a query from its cache, it forwards it to a root server. It then responds with a referral to the appropriate TLD name server by using the domain name extension (such as .com, .net, or .org). There are 13 types of root servers, allowing speedy and reliable responses.
- TLD nameservers. TLD servers host and maintain information for all the domain names (the part after the last dot in the URL). Upon the root server’s query, TLD name servers direct the request to the authoritative DNS server that hosts the correct domain based on its name (for example, upon receiving a wikipedia.org query, the recursive resolver sends a query to a .org TLD name server, which forwards it to the authoritative server).
- Authoritative DNS server. An authoritative DNS server, or authoritative name server, is always the final data point in the IP address retrieval process — it’s the last segment of the DNS server chain. When an authoritative DNS server receives a DNS request, it doesn’t need to communicate with any other servers. The authoritative server already has the data needed to answer the DNS query.
What is a DNS cache?
A DNS cache is a temporary database maintained by a computer’s operating system or a network’s DNS server that stores DNS query results. Meanwhile, DNS caching is a process in which a DNS server saves IP addresses and matches URLs. DNS TTL controls DNS caching, speeds up DNS lookups, and saves processing power.
If a browser has a DNS cache, the cache can directly find the correct identifying records instead of communicating with DNS servers to retrieve an IP address. By retrieving the necessary data from a local cache, loading speeds can be kept as short as possible. Sometimes, it’s useful to clear, or “flush,” your cache, especially if you start experiencing HTTP errors, such as the 502 bad gateway, or if you encounter a “DNS server not responding” error.
A data cache isn’t limited by operating system or browser, with a user’s internet service provider often providing its own recursive resolver cache to keep bandwidth at reasonable levels. If, however, the issue occurs, you can always troubleshoot the DNS servers with a nslookup command.
DNS vs. IP
The DNS helps convert easy-to-remember domain names, like www.example.com, into numerical IP addresses, like 192.0.2.1, which computers use to find each other. Such a principle makes the DNS a simple and user-friendly way for people to visit websites without memorizing complex numbers.
| Aspects | DNS | IP Addresses |
|---|---|---|
Purpose | Translates human-readable domain names into IP addresses | Uniquely identifies devices on a network |
Human readability | Simple to read, uses domain names like www.example.com | Hard to read, uses numerical addresses like 192.0.2.1 |
Components | DNS resolvers, root servers, TLD servers, authoritative servers | IPv4 addresses, IPv6 addresses |
Types of records | A, AAAA, CNAME, MX, TXT, etc. | IPv4 (32-bit), IPv6 (128-bit) |
Role in networking | User-friendly navigation, organizing internet resources | Fundamental communication and data transfer |
User interaction | Users interact with the DNS by entering domain names | Users generally do not interact directly with IP addresses |
While most domain names will have a unique IP address, some domains have multiple addresses. Giant corporations like Apple or Amazon potentially have thousands of servers worldwide, each with a specific IP address. DNS data ensures that the domain name will always connect to the best local DNS server, though you can change the DNS server you’re connected to if necessary.
Importance of DNS security
DNS security is essential for internet users, businesses, and all online entities. Like any other cyberinfrastructure, DNS servers are susceptible to attacks from malicious actors. Suffering DNS attacks can expose individuals and businesses to malicious websites, data breaches, and compromised security networks.
While cybersecurity experts continue working on innovations like DNS over HTTPS (DoH) and DNS over TLS (DoT) that use DNS encryption, users should remember to be vigilant. You can always test your DNS for leakage and use additional cybersecurity measures (such as a VPN) to protect your internet connection from malicious actors.
Changing your DNS server
Changing your current DNS server can significantly impact your internet experience if you’re looking for better speed and a safer connection. To do so, follow a few simple instructions.
- Find the magnifying glass icon at the bottom of your computer screen and click on it.

- When a window with a search bar appears, type in “Manage network adapter settings” and open the matching result.
- Find either “Ethernet” or “Wi-Fi,” depending on which one you are using, and click on it. More details will appear, including the option to “View additional properties.” Click it.
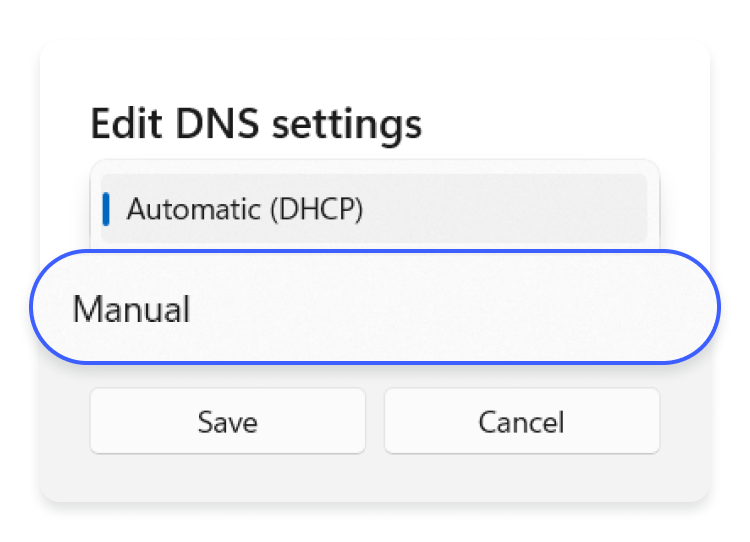
- Next to “DNS server assignment,” press the “Edit” button.
- In the small pop-up box, select “Manual.”
- Now, adjust the settings as follows:
- “IPv4” turned “On.”
- Preferred DNS: [type in the primary DNS address]
- Alternate DNS: [type in the secondary DNS address]
- “IPv6” turned “Off.”
- Click “Save.” And you’re done!


If you’re not a Windows user, you can find a full guide on how to change the DNS of all devices. In addition, NordVPN DNS servers can be automatically configured on your devices to prevent potential DNS leaks.